당신은 주제를 찾고 있습니까 “system thread exception not handled 블루 스크린 – Windows 10에서 \”시스템 스레드 예외가 처리되지 않음\” 오류를 수정하는 방법“? 다음 카테고리의 웹사이트 https://hu.taphoamini.com 에서 귀하의 모든 질문에 답변해 드립니다: https://hu.taphoamini.com/photos/. 바로 아래에서 답을 찾을 수 있습니다. 작성자 Reviewsed 이(가) 작성한 기사에는 조회수 92,131회 및 좋아요 867개 개의 좋아요가 있습니다.
Table of Contents
system thread exception not handled 블루 스크린 주제에 대한 동영상 보기
여기에서 이 주제에 대한 비디오를 시청하십시오. 주의 깊게 살펴보고 읽고 있는 내용에 대한 피드백을 제공하세요!
d여기에서 Windows 10에서 \”시스템 스레드 예외가 처리되지 않음\” 오류를 수정하는 방법 – system thread exception not handled 블루 스크린 주제에 대한 세부정보를 참조하세요
Facing “System Thread Exception Not Handled” Error, Check the easy and simple steps to fix this error, and you guys can also read our article.
https://www.reviewsed.com/system-thread-exception-not-handled/
#howto #diy #tech #windows #tips #reviewsed
system thread exception not handled 블루 스크린 주제에 대한 자세한 내용은 여기를 참조하세요.
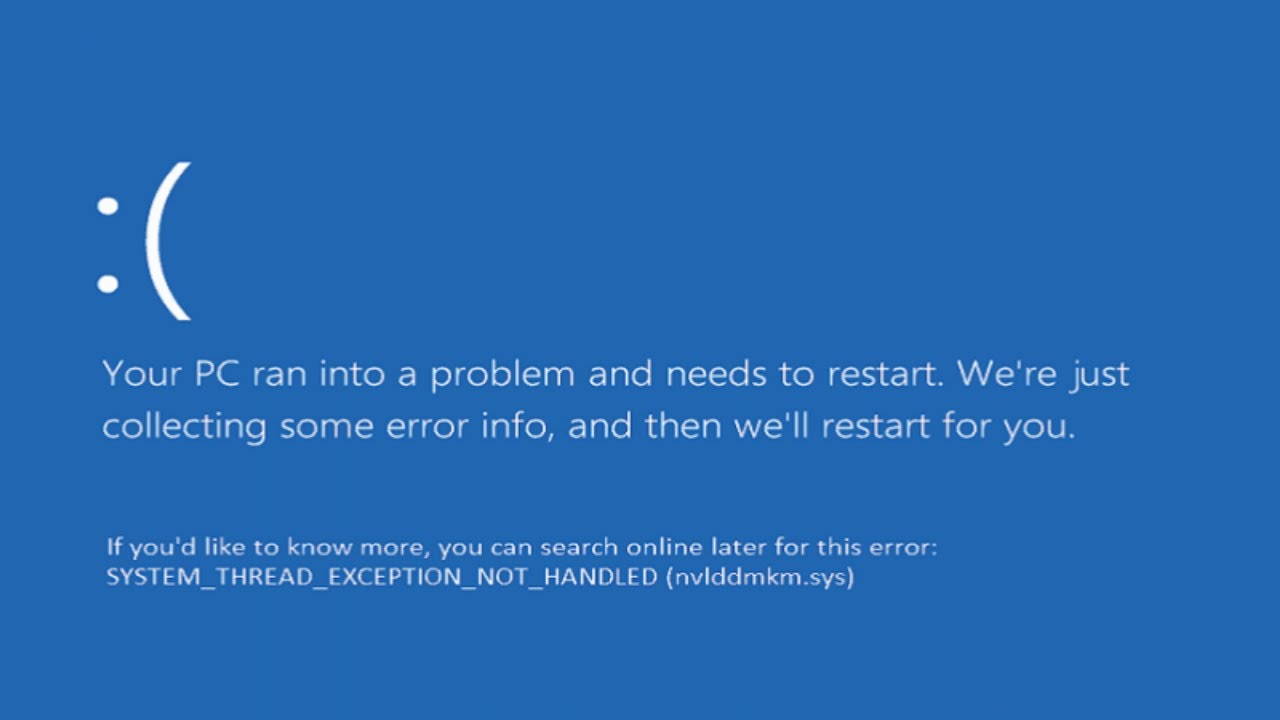
SYSTEM THREAD EXCEPTION NOT HANDLED
그리고 USB를 꽂아서 윈도우 설치 화면으로 넘어가려는데 SYSTEM THREAD EXCEPTION NOT HANDLED 블루스크린이 영어상태로 무한 재부팅이 됩니다. 이거땜에 컴퓨터 못하게 …
Source: answers.microsoft.com
Date Published: 5/17/2021
View: 6241
윈도우. SYSTEM THREAD EXECTION NOT HANDLEED 오류 …
윈도우의 끔찍한 블루 스크린 중 하나인 SYSTEM_THREAD_EXECECTION_NOT_HANDLEED 는 정상적인 오류 처리를 방해합니다. 이 문제를 해결하고 고치기 위해서는 어떻게 …
Source: onna.kr
Date Published: 3/7/2021
View: 9255
문제 해결: 시스템 스레드 예외가 처리되지 않음
SYSTEM THREAD EXCEPTION NOT HANDLED는 중요한 Windows 서비스를 실행하는 프로세스의 스레드가 오작동할 때 죽음의 블루 스크린(BSOD)에 나타나는 오류 …
Source: windowsbulletin.com
Date Published: 2/3/2022
View: 5709
시스템 스레드 예외가 처리되지 않는 오류 수정 [6 Effective Fixes]
Windows의 다른 BSOD 오류와 마찬가지로 이 오류도 블루 스크린과 오류 메시지와 … 장치 드라이버는 System Thread Exception Not Handled Windows 10 컴퓨터에서 …
Source: laptop28.com
Date Published: 3/23/2021
View: 1958
System Thread Exception not Handled – Fix it in 5 … – LazyAdmin
The blue screen is caused by a faulty driver that is installed on your system. Drivers can get updated automatically or they are being installed …
Source: lazyadmin.nl
Date Published: 8/30/2021
View: 1409
How to Fix the “SYSTEM THREAD EXCEPTION NOT …
How to Fix the “SYSTEM THREAD EXCEPTION NOT HANDLED” BSOD Stop Code in Windows 10 · 1. Boot Into Safe Mode · 2. Finding Which Driver is …
Source: www.makeuseof.com
Date Published: 12/22/2021
View: 1358
Windows 10에서 “시스템 스레드 예외가 처리되지 않음” 오류 …
System Thread Exception Not Handled 일반적인 Windows 10 BSOD 또는 Blue Screen of Death입니다. 이 오류는 하나 이상의 이유로 인해 발생할 수 있으므로 다른 BSOD보다 …
Source: 300error.com
Date Published: 4/10/2021
View: 149
시스템 스레드 예외가 처리되지 않는 BSOD를 수정하는 방법
윈도우 10 System Thread Exception Not Handled BSOD(죽음의 블루 스크린) 오류는 결함이 있거나 사용되지 않거나 손상된 장치 드라이브와 관련이 있습니다.
Source: affizon.com
Date Published: 1/21/2022
View: 461
FIX: SYSTEM THREAD EXCEPTION NOT HANDLED – Appuals
This error mainly occurs due to a driver malfunction. An outdated, corrupted or incompatible driver can get your system into display this blue …
Source: appuals.com
Date Published: 9/20/2021
View: 632
주제와 관련된 이미지 system thread exception not handled 블루 스크린
주제와 관련된 더 많은 사진을 참조하십시오 Windows 10에서 \”시스템 스레드 예외가 처리되지 않음\” 오류를 수정하는 방법. 댓글에서 더 많은 관련 이미지를 보거나 필요한 경우 더 많은 관련 기사를 볼 수 있습니다.
주제에 대한 기사 평가 system thread exception not handled 블루 스크린
- Author: Reviewsed
- Views: 조회수 92,131회
- Likes: 좋아요 867개
- Date Published: 2021. 6. 8.
- Video Url link: https://www.youtube.com/watch?v=7oXMoJQuWKk
윈도우. SYSTEM THREAD EXECTION NOT HANDLEED 오류를 수정하는 방법
윈도우의 끔찍한 블루 스크린 중 하나인 SYSTEM_THREAD_EXECECTION_NOT_HANDLEED 는 정상적인 오류 처리를 방해합니다. 이 문제를 해결하고 고치기 위해서는 어떻게 해야 할까요??
윈도우. SYSTEM THREAD EXECTION NOT HANDLEED 오류를 수정하는 방법
Windows 프로그래밍 문서에 따르면 일반적으로 잘 알려진 세 가지 예외 코드를 포함하고 있으며, 이는 Windows에서 버그 검사 또는 중지 코드 오류를 더욱 명확히 밝혀준다고 합니다.
0x80000002: STATUS_DATATYPE_MISALIGNING은 비정렬 데이터 참조가 발견되었음을 난타냅니다. 0x80000003: 시스템에 커널 디버거가 연결되어 있지 않을 때 중단지점 또는 ASCRESS가 발생했음을 나타냅니다. 0xC0000005: STATUS_Access_VISION은 메모리 액세스 위반이 발생했음을 나타냅니다.
이 코드 중 세 번째항목의 문제일 가능성이 가장 높습니다.
SYSTEM_THREAD_EXCEPTION_NOT_HANDLED 해결하기.
SYSTEM_THREAD_EXECTION_NOT_HANDLEED에서 충돌 덤프를 분석할 때 나타나는 또 다른 일반적인 비트는 atikmdag.sys, igdkmd64.sys 또는 nvldmkm.sys와 같은 파일 이름이을 자주 접할 수있습늬다. AMD ATI, Intel 그래픽 회로 및 NVIDIA GeForce 그래픽 드라이버의 런타임 환경의 일부로서 이러한 이름을 인식하게 됩니다. 이러한 이름이나 다른 이름들을 볼 경우, 통상적으로 그래픽 드라이버가 이 오류 코드로 태그가 지정된 블루스크린에 이르는 상황에서 도움을 받았을 가능성이 있습니다.
여기서 볼 수 있는 방법은 다음 세 가지 방법을 시도해 볼 수 있습니다.
최신 버전의 그래픽 드라이버를 사용할 수 있는지 확인해 보고 가능한다면 설치합니다. 모든 업데이트는 어떤 문제를 해결하기 위해서 이루어지는 경우가 많습니다. 반대로 장치 관리자에서 이전 버전의 드라이버로 되돌려 보기를 바랍니다. 여기서 “드라이버 롤백” 옵션이 회색으로 표시되어 있다는 점에 유의하십시오. 즉, 대상 PC에서 이 옵션을 사용할 수 없다는 것입니다. 롤백을 사용할 수 없거나 도움이 되지 않는 경우 제조업체의 드라이버 다운로드 페이지를 찾아 다음 이전 버전을 사용해 보십시오.
효과가 있는 것을 찾을 때까지 반복해야합니다..
그래픽 드라이버 완전히 삭제 후 다시 설치
그래픽 환경을 완전히 정리한 후 새로운 드라이버의 “클린 설치”를 통해 문제가 해결 될 수도있습니다.이를 위해 DDU(Display Driver Uninstaller)로 그래픽카드의 드라이버를 완전하게 제거할 수 있습니다.
DDU는 AMD및 NVIDIA 모두 가리지 않고 사용가능합니다. 이전에 설치한 그래픽 드라이버의 흔적을 모두 제거하여 처리할 수 있는 완전한 방법을 제공합니다.
해당 프로그램을 통해 그래픽 드라이버를 완전하게 지우고 다시 해당 그래픽카드의 드라이버 중 가장 안정적 이라고 평가되는 드라이버 를 설치하시기 바랍니다.
SYSTEM_THREAD_EXECTION_NOT_HANDLEED에 대해 수행할 다른 작업
아직도 SYSTEM_THREAD_EXECTION_NOT_HANDLEED 중지 코드가 남아있다면 ‘클린부팅’을 시도해보는것이 좋습니다.
🔗관련 : 윈도우10 /11 클린부팅하는 방법과 클린부팅 후 문제를 해결하는 방법
만약 이것이 도움이 된다면, 시작 소프트웨어에 있는 무언가가 아마도 이 블루스크린을 띄우는 문제를 찾을 수있을것이고 그를 통해 해당 문제를 해결해야합니다.
클린부팅이 도움이 되지 않는다면 시스템을 안전 모드로 부팅하여 기본 제공되는 DISM(배포 이미지 서비스 및 관리)명령을 사용해 윈도우 이미지를 복구하는 방법을 사용해 볼 수있습니다.
명령프롬프트(cmd)를실행하고 아래의 명령어를 입력하세요
dism /online /cleanup-image /restorehealth
대부분의 경우 이것은 없어졌거나 손상 된 윈도우의 이미지 파일을 수정할 수있습니다. 다음으로 복구를 시도해보세요.
명령프롬프트(cmd)를실행하고 아래의 명령어를 입력하세요
sfc/scannow
이렇게 하면 Windows System File Checker(SFC)를 실행하며 발견된 손상되거나 의심되는 시스템 파일을 모두 교체할 수 있습니다. 이 두 명령 모두 완료하는 데 시간이 시간이 꽤 걸릴 수도있기 때문에 충분히 기다릴 시간이 필요합니다.
일단 이 문제를 해결하기 위해서 지금까지 찾아본 방법은 위와 같습니다. 위에 나열된 방법들을 통해서 블루 스크린이 나타나는 문제가 해결이 되었으면 좋겠습니다.
[ 함께 볼만한 글 ]이상으로 포스팅을 마치겠습니다
앞으로 더 다양한
짜달시리 중요하진 않지만 알아두면 어딘가엔 쓸 내용으로 찾아뵙겠습니다.
감사합니다
반응형
문제 해결: 시스템 스레드 예외가 처리되지 않음
최종 업데이트 : 22 년 2021 월 XNUMX 일
7 월 2022 업데이트 됨: 우리의 최적화 도구를 사용하여 오류 메시지를 받지 않고 시스템 속도를 늦추십시오. 지금 다운로드 이 링크
다운로드 및 설치 여기에 수리 도구. 컴퓨터를 스캔하도록 합니다. 그러면 도구가 컴퓨터 수리.
SYSTEM THREAD EXCEPTION NOT HANDLED는 대부분 오래되거나 호환되지 않는 드라이버로 인해 발생하는 일반적인 Windows 10 오류입니다.
여러 드라이버가 문제의 원인이 될 수 있고 때때로 컴퓨터가 모든 드라이버를 인식하지 못하기 때문에 다른 BSOD보다 이 문제를 해결하는 것이 더 어렵습니다. 따라서 이 오류를 수정하는 첫 번째 단계는 문제를 일으키는 정확한 드라이버를 찾는 것입니다.
이 글에서는 이 코드가 무엇을 의미하는지, 언제 발생하는지, 왜 발생하는지 살펴보고 문제를 해결하는 효과적인 방법을 제시합니다.
SYSTEM THREAD EXCEPTION NOT HANDLED 오류의 원인은 무엇입니까?
“SYSTEM_THREAD_EXCEPTION_NOT_HANDLED” 오류는 컴퓨터를 종료하거나 재부팅한 후 컴퓨터를 시작할 때 주로 발생합니다. 그러나 산발적으로 발생할 수 있으며 특정 그래픽 드라이버가 필요한 프로그램을 사용자가 실행할 때 발생하는 것으로 알려져 있습니다.
이 오류는 컴퓨터에 오래되거나 손상되었거나 단순히 불량인 호환되지 않는 드라이버(대부분 그래픽 드라이버)가 설치되어 있을 때 발생합니다. 그래픽 드라이버는 맬웨어에 의해 손상될 수 있으며 잘못 설치될 수도 있습니다. 이것이 Windows 10에 “system_thread_exception_not_handled” 메시지가 나타나는 또 다른 이유입니다.
SYSTEM THREAD EXCEPTION NOT HANDLED 문제를 해결하는 방법은 무엇입니까?
7 월 2022 업데이트 : 이제 이 도구를 사용하여 파일 손실 및 맬웨어로부터 보호하는 등 PC 문제를 방지할 수 있습니다. 또한 최대 성능을 위해 컴퓨터를 최적화하는 좋은 방법입니다. 이 프로그램은 Windows 시스템에서 발생할 수 있는 일반적인 오류를 쉽게 수정합니다. 손끝에 완벽한 솔루션이 있으면 몇 시간 동안 문제를 해결할 필요가 없습니다. 1 단계 : PC 수리 및 최적화 도구 다운로드 (Windows 10, 8, 7, XP, Vista – Microsoft Gold 인증).
(Windows 10, 8, 7, XP, Vista – Microsoft Gold 인증). 2 단계 : ” 스캔 시작 “PC 문제를 일으킬 수있는 Windows 레지스트리 문제를 찾으십시오.
“PC 문제를 일으킬 수있는 Windows 레지스트리 문제를 찾으십시오. 3 단계 : “모두 고쳐주세요”모든 문제를 해결합니다.
드라이버 업데이트, 재설정 또는 재설치
“Windows + X” 키를 누릅니다. 팝업 메뉴에서 “장치 관리자”를 선택합니다. 드라이버 업데이트, 재설정 또는 재설치(특히 비디오 카드, 네트워크 카드, 사운드 카드 등의 드라이버)
드라이버 업데이트:
디렉터리를 확장하고 드라이버를 마우스 오른쪽 버튼으로 클릭하여 드라이버 업데이트를 선택합니다.
팝업 창에서 자동으로 드라이버 소프트웨어 업데이트 확인을 선택합니다.
드라이버 재설정:
디렉터리를 확장하고 드라이버를 마우스 오른쪽 버튼으로 클릭하여 속성을 선택합니다.
드라이버 탭으로 이동하여 드라이버 재설정을 클릭합니다.
이유를 선택하고 예를 클릭합니다.
드라이버 재설치:
먼저 장치를 제거합니다.
장치 제조업체의 웹 사이트에서 드라이버를 찾고 지침에 따라 설치하십시오.
펌웨어 업데이트
“Windows + R” 키를 누릅니다. 시작 창에 “msconfig”를 입력하고 “확인”을 클릭하여 시스템 구성을 엽니다. 도구로 전환합니다. “시스템 정보”를 강조 표시하고 “시작”을 누릅니다. 그런 다음 BIOS 버전/날짜를 기억하십시오. 제조업체 웹 사이트에서 올바른 새 버전의 BIOS를 다운로드합니다. 새 BIOS 버전이 있는 USB 플래시 드라이브를 삽입하고 BIOS를 열어 펌웨어를 업데이트합니다.
시스템 파일 복원
Windows 10의 “시스템 스트림 예외가 처리되지 않음” 오류는 손상된 시스템 파일로 인해 발생할 수 있습니다. SFC 및 DISM 프로그램을 실행하여 복구할 수 있습니다. 이 방법은 컴퓨터가 안전 모드로 부팅할 수 있는지 여부에 적용됩니다.
SFC에 대한 지침:
1.) 관리자로 명령 프롬프트를 엽니다.
안전 모드:
Windows 검색 창에 “명령 프롬프트”를 입력하십시오.
명령 프롬프트 아이콘을 마우스 오른쪽 버튼으로 클릭하고 “관리자 권한으로 실행”을 선택합니다.
컴퓨터가 시작되지 않는 경우:
문제 해결 -> 고급 옵션 -> 명령 프롬프트로 이동합니다.
2.) “sfc /scannow”를 입력하고 Enter 키를 누릅니다.
3.) 그런 다음 프로세스가 완료될 때까지 기다립니다.
DISM 지침:
명령 프롬프트를 열고 관리자로 실행하십시오. 다음 명령을 하나씩 입력하십시오.
exe /온라인 /Cleanup-image /Scanhealth
exe / Online / Cleanup-Image / Restorehealth
전문가 팁 : 이 복구 도구는 리포지토리를 검색하고 이러한 방법이 효과가 없는 경우 손상되거나 누락된 파일을 교체합니다. 문제가 시스템 손상으로 인한 대부분의 경우에 잘 작동합니다. 또한 이 도구는 시스템을 최적화하여 성능을 최대화합니다. 그것은에 의해 다운로드 할 수 있습니다 여기를 클릭
자주 묻는 질문
시스템 스레드 예외가 처리되지 않는 오류 수정 [6 Effective Fixes]
System Thread Exception Not Handled error Windows 10 및 Windows 8 사용자 사이의 일반적인 문제이며 시스템에서 수행하는 작업과 상관없이 PC에 언제든지 나타날 수 있습니다.
이 오류가 언제 발생할지 예측할 수 없지만 대부분의 사용자는 부팅 시 오류를 경험합니다. Windows의 다른 BSOD 오류와 마찬가지로 이 오류도 블루 스크린과 오류 메시지와 함께 제공됩니다.
이 오류, 손상된/오래된 장치 드라이버, 오래된 OS 실행, 손상된 시스템 파일, 오래된 BIOS 등 여러 가지 이유가 있을 수 있습니다.
그러나 이유가 무엇인지는 중요하지 않습니다. 항상 이 오류를 수정할 수 있습니다. 그리고 더 쉽게 사용할 수 있도록 여기에서 다른 사용자에게 효과가 있었던 최고의 솔루션을 제공하겠습니다. 따라서 자신에게 맞는 솔루션을 얻지 않는 한 모든 솔루션을 하나씩 시도하십시오.
Windows 10에서 시스템 스레드 예외가 처리되지 않음 오류를 수정하는 방법은 무엇입니까?
해결 방법 1: 장치 드라이버 업데이트 또는 롤백 또는 재설치
장치 드라이버는 System Thread Exception Not Handled Windows 10 컴퓨터에서 오류가 발생했습니다. 따라서 이 방법에서는 드라이버를 업데이트/롤백/재설치할 것입니다.
이렇게 하면 장치 드라이버 비호환성 및 드라이버와 관련된 기타 문제가 해결됩니다. 그러나 이러한 수정 사항을 적용하기 전에 컴퓨터를 안전 모드에서 시작하십시오.
1: Update Device Drivers
눌러 Windows + X함께 선택하고 Device Manager.
에서 Device Manager 장치 범주를 클릭하여 섹션을 확장합니다.
장치 범주를 클릭하여 섹션을 확장합니다. 장치를 마우스 오른쪽 버튼으로 클릭하고 Update Driver.
클릭 Search automatically for updated driver software.
이제 Windows에서 새 업데이트를 검색하여 컴퓨터에 설치합니다.
2: Roll Back Device Driver
경우에 따라 특정 업데이트로 인해 문제가 발생합니다. 따라서 특정 장치 드라이버를 업데이트한 후 컴퓨터에서 이 BSOD 오류가 발생하면 롤백하여 이 오류를 수정하십시오.
로 이동 Device Manager > 장치 범주를 클릭합니다.
> 장치 범주를 클릭합니다. 장치를 마우스 오른쪽 버튼으로 클릭하고 선택 Properties.
로 전환 Driver 탭을 클릭하고 Roll Back Driver 단추.
다음 팝업 창에서 드라이버를 롤백하는 이유를 선택한 다음 Yes 단추.
3: Reinstall Driver
위의 두 가지 방법 중 어느 것도 해결되지 않으면 장치 드라이버를 다시 설치하면 문제가 해결될 수 있습니다. System Thread Exception Not Handled error.
열려있는 Device Manager > 장치 범주를 클릭합니다.
> 장치 범주를 클릭합니다. 장치 이름을 마우스 오른쪽 버튼으로 클릭하고 Uninstall device 컨텍스트 메뉴에서 옵션.
그런 다음 제거를 확인합니다.
을 체크하다 Delete the driver software for this device 확인란을 선택하고 OK 단추.
해결 방법 2: 손상된 시스템 파일 복구
이 BSOD를 유발할 수 있는 다음 가능한 이유 System Thread Exception Not Handled error Windows 10 PC에서 시스템 파일이 손상되었습니다. 따라서 컴퓨터에 손상된 시스템 파일이 있으면 이러한 오류가 발생하고 컴퓨터를 BSOD 오류로 실행합니다.
따라서 Windows 내장 유틸리티인 SFC 및 DISM을 사용하여 손상된 파일을 복구해야 합니다. SFC 스캔을 실행하려면 다음 단계를 따르십시오.
유형 cmd 윈도우에서 Search 상자.
윈도우에서 상자. 마우스 오른쪽 버튼으로 클릭 Command Prompt 그리고 선택 Run as administrato아르 자형.
명령에서 이 명령을 입력하고 Enter:
sfc/scannow
이 명령은 시스템을 검사하고 손상된 시스템 파일을 모두 복구합니다.
SFC 스캔을 실행한 후 오류가 수정되었는지 확인하십시오. 오류가 지속되면 DISM 스캔을 실행하십시오.
열려있는 Command Prompt 이 명령을 입력하고 Enter:
Exe /Online /Cleanup-image /Scanhealth Exe /Online /Cleanup-image /Restorehealth
이 유틸리티는 손상된 파일을 정상적인 복사본으로 교체합니다.
해결 방법 3: 결함이 있는 장치 드라이버 이름 바꾸기
nvlddmkm.sys, atikmdag.sys, bnistack6.sys 등의 파일명이 옆에 보이면 System Thread Exception Not Handled error, 이것이 범인 드라이버입니다. 따라서 이 범인 드라이버 파일 이름을 바꾸면 주어진 BSOD 오류를 수정할 수 있습니다.
이를 위해 다음 지침을 따르십시오.
열기 Command Prompt > 주어진 명령을 입력 > 누르십시오 Enter 각 명령 후:
c: dir
명령 결과에 Windows 폴더가 표시되면 문제가 없는 것입니다. 그러나 표시되지 않으면 명령을 입력하십시오. d: 를 누르고 Enter .
를 누르고 . 이제 명령 프롬프트에 다음 명령을 입력하고 Enter 각 명령을 입력한 후:
cd windowssystem32drivers ren drivername.sys drivername.old
메모: 위의 명령에서 drivername을 결함이 있는 드라이버 이름으로 바꿉니다.
컴퓨터를 다시 시작합니다. Windows는 삭제된 드라이버를 자동으로 설치합니다.
드라이버가 자동으로 설치되지 않으면 다음을 엽니다. Device Manager .
. 당신은 볼 수 있습니다 yellow exclamation mark 제거된 장치 드라이버에서. 그것을 마우스 오른쪽 버튼으로 클릭하고 선택하십시오 Update Driver .
제거된 장치 드라이버에서. 그것을 마우스 오른쪽 버튼으로 클릭하고 선택하십시오 . 클릭 Search automatically for Updated Driver Software .
. 이제 Windows는 온라인에서 드라이버를 검색하고 찾으면 설치합니다.
해결 방법 4: 사운드 카드 드라이버 제거
가끔, 이 System Thread Exception Not Handled error 결함이 있거나 손상된 사운드 카드 드라이버로 인해 발생할 수 있습니다. 이 시나리오에서는 사운드 카드 드라이버를 업데이트하는 것만으로는 문제를 해결할 수 없으므로 드라이버를 제거하고 기본 드라이버로 교체해야 합니다.
눌러 Windows + R keys 실행 대화 상자를 시작합니다.
실행 대화 상자를 시작합니다. 유형 devmgmt.msc 실행 상자에서 Enter 시작하기 위해 Device Manager.
장치 관리자 창에서 Sound, video and game controllers .
. 드라이버를 마우스 오른쪽 버튼으로 클릭하고 Uninstall device.
이제 작업을 확인하고 다음 창에서 Delete the driver software for this device 옵션을 클릭한 다음 OK .
옵션을 클릭한 다음 . 그런 다음 컴퓨터를 다시 시작합니다.
컴퓨터가 시작되면 Windows는 자동으로 사운드 카드의 기본 드라이버를 설정합니다.
그러나 Windows가 사운드 카드 드라이버를 교체하지 못한 경우 Device Manager > 을 선택 Action, > 클릭 Scan for hardware change.
하드웨어 변경 사항 검색
해결 방법 5: BIOS 업데이트 확인
BIOS가 호환되지 않거나 메모리/IRQ 충돌이 있는 경우에도 이 오류가 발생할 수 있습니다. 이 경우 BIOS 업데이트를 시도할 수 있지만 이 사실을 잘 알고 있는 경우에만 수행하지 않으면 전문가에게 문의하십시오.
마더보드 제조업체의 웹사이트에서 BIOS 업데이트를 확인합니다. 웹사이트를 확인하기 전에 마더보드의 모든 세부 정보를 알고 있는지 확인하십시오.
마더보드 세부 정보를 확인하려면 다음 단계를 따르십시오.
눌러 Windows + R .
. 유형 cmd 실행 대화 상자에서 Enter .
실행 대화 상자에서 . 명령 프롬프트에서 아래 명령을 입력합니다.
wmic baseboard get manufacturer, product
이제 마더보드 제조업체 및 모델 제품 번호에 대한 세부 정보를 얻을 수 있습니다.
BIOS 파일이 .zip 또는 .exe 형식으로 제공되기 때문에 BIOS 업데이트를 설치하는 것은 상당히 복잡한 작업입니다.
대부분 제조업체의 웹 사이트에서 설치 지침을 제공하므로 주어진 지침에 따라 BIOS를 업데이트하십시오. 다음은 설치 지침의 예입니다.
해결 방법 6: PC 재설정
글쎄, 이것은 시스템 스레드 예외가 처리되지 않음 오류를 수정하기 위한 마지막 수동 솔루션입니다. 이 방법에서는 PC를 초기화해야 합니다. 마지막 옵션이지만 효율적이고 이 BSOD 오류를 수정할 수 있습니다.
Windows 10 PC를 재설정하려면 다음 단계를 따르십시오.
윈도우로 이동 Start 그리고 Settings .
그리고 . Windows 설정 앱에서 Update & Security .
. 클릭 Recovery 창의 왼쪽 창에 주어진다.
창의 왼쪽 창에 주어진다. 다음 창에서 Reset this PC .
. 클릭 Get started .
. 다음 중 하나를 클릭하십시오. Keep my files 또는 Remove everything 귀하의 필요에 따라 s.
또는 귀하의 필요에 따라 s. 선택 Just remove my files/ Remove files and clean the drive 선택한 경우 Remove everything 이전 단계에서.
선택한 경우 이전 단계에서. 컴퓨터를 유지하려면 다음을 선택하십시오. Just remove my files 옵션.
옵션. 클릭 Next .
. 이제 Reset .
. 이제 Windows가 다시 시작되며 자체 재설정하는 데 시간이 걸릴 수 있습니다.
마지막으로 Continue 메시지가 표시될 때.
권장 솔루션 – 시스템 스레드 예외가 처리되지 않는 BSOD 오류 수정
Windows 컴퓨터에 여러 가지 완고한 오류가 표시되거나 시스템이 느리게 실행되는 경우 여기에서 간단히 다음을 사용하여 시스템을 스캔하는 것이 좋습니다. PC Repair Tool.
이것은 다양한 PC 문제 및 오류를 수정하도록 설계된 고급 다기능 도구입니다. 이것 뿐만 아니라 다음과 같은 다른 컴퓨터 오류도 수정할 수 있습니다. DLL errors, BSOD errors, prevent file loss, protect your computer from virus or malware infection, repair registry entries그리고 훨씬 더.
또한 손상되고 손상된 Windows 시스템 파일을 복구합니다. improve PC performance 새것처럼.
PC 또는 노트북 오류를 무료로 만들기 위해 PC 수리 도구 받기
결론
BSOD 오류는 문제에 대해 언제든지 발생할 수 있지만 고맙게도 문제를 해결하는 것은 매우 쉽습니다. 그래서, 당신이 얻는 경우 System Thread Exception Not Handled error Windows 10 PC에서 무엇을 해야 하는지 알 수 있습니다.
간단히 이 솔루션을 사용하고 몇 번의 클릭으로 이 문제를 해결하십시오. 그러나 이러한 수정으로 작업이 완료되지 않은 경우 추가 지침과 도움을 요청할 수 있습니다. Facebook 에게 Twitter. 시스템 문제를 해결하기 위해 최선을 다할 것입니다.
System Thread Exception not Handled
You reboot or start your Windows 10 computer and you get a blue screen with the stop code System Thread Exception not Handled. A reboot won’t fix it as you probably noticed. Is there a way out of this boot loop?
The blue screen is caused by a faulty driver that is installed on your system. Drivers can get updated automatically or they are being installed after you have connected a new piece of hardware.
So how can we fix this “system_thread_exception_not_handled” error in Windows 10? In this article, I have described a couple of methods that will help you restore your system.
“System Thread Exception not Handled” cause
Before we can fix the system_thread_exception_not_handled error we first need to understand what is going on. When you start your computer Windows 10 will load all the necessary drivers that are installed. Sometimes a driver is not compatible with your Windows version or there is maybe a bug in the driver.
This prevents Windows 10 from starting correctly leading to a blue screen (BSOD) with the error SYSTEM THREAD EXCEPTION NOT HANDLED. Sometimes the problems occur out of nowhere, one day your computer is working fine and the next day it won’t start anymore.
Windows updates or automatic driver updates are most of the time cause of these sudden problems. They will install new drivers automatically which get loaded after a reboot.
Fix System Thread Exception not Handled
There are a couple of methods to fix the system thread exception not handled stop code in Windows 10. We are going to start with the most common solutions, if a step doesn’t solve your problem then just go to the next step.
If you have recently installed new hardware or connected a new device to your computer, then start with disconnecting the device from your computer. Newly installed or connected hardware is one of the most common causes of the stop code system thread exception not handled.
Step 1 – Boot into safe mode
Most of the time when you get the blue screen with system_thread_exception_not_handled stop code you won’t be able to boot to Windows. So the first step is to boot into safe mode.
If you can start Windows normally, then try the steps below without safe mode first.
Your computer will start the Recovery mode after 3 failed start attempts:
Start your computer When you see the Windows or notebook brand logo hold the power button (for 10 seconds) until your computer shutsdown. Repeat this 3 times (Step 1 and 2) Windows will start Automatic Repair or show a Recovery screen.
as
If you get the Automatic Repair screen: Choose Advanced options Select Startup Settings
If you get the Recovery Screen: Press F8 for Startup Settings
In the Startup Settings menu choose 5) Enable Safe Mode with Networking The Windows Logon Screen will load, login with your account.
If this doesn’t work for you then follow the steps described here to boot into safe mode.
Step 2 – Use a Windows Restore Point
Windows 10 can create automatically restore points before each system change. It’s worth checking if you have a restore point and try to roll back to it.
When you use restore point then only the system change is rolled back. You won’t lose any personal data or files on your computer.
Open Start and click on Settings (gear icon) Type Recovery the search box at the top and open Recovery
Select Open System Restore If you see a red stop sign, then system restore is turned off. Go to Step 3 – Find the faulty driver. Otherwise click on Next Select a restore point with a date from before the problems occured
Click on Next and Finish.
Windows will need to restart to roll back to the previous restore point. If the restore point didn’t help then continue to the next step.
Step 3 – Find the faulty driver
With Windows 10 now loaded into safe mode, we need to find the driver that is causing the problem. There are a couple of ways to do this, but a good start point is to review the blue screen. We can use a small program to analyze the blue screen error, Blue Screen Viewer. This program will tell us which driver caused the error.
Download the program and open the zip file. Start the BlueScreenView application. If you get a User Account Control warning, click yes.
The bug check string (1) will show the stop code that you have seen on the blue screen itself. I have simulated a blue screen here, but in your case, it will show system_thread_exception_not_handled. It will also show which driver caused the error (2).
You can use Google to find which device the driver belongs to. A couple of common drivers that can cause their errors are:
Nvlddmkm.sys – Graphics card driver from Nvidia. Download the latest or an older version of the driver here at Nvidia.
– Graphics card driver from Nvidia. Download the latest or an older version of the driver here at Nvidia. Atikmdag.sys – Graphics card driver from AMD (ATI) Radeon. New drivers can be found here.
– Graphics card driver from AMD (ATI) Radeon. New drivers can be found here. CorsairVBusDriver.sys – Corsair Utility Engine driver. Get a new driver here
– Corsair Utility Engine driver. Get a new driver here I gdkmd64. sys – Intel Graphics card driver. New drivers for Intel graphics cards can be downloaded here.
– Intel Graphics card driver. New drivers for Intel graphics cards can be downloaded here. Ntfs.sys – Windows System file related. Follow this article to repair your Windows system files.
– Windows System file related. Follow this article to repair your Windows system files. dxgmms2.sys – Error related to DirectX. DirectX is used by your graphics cards. Update your graphic card driver to fix the error.
If you were able to find a driver that is causing the SYSTEM THREAD EXCEPTION NOT HANDLED error then the next step is to replace or remove the driver. The best option is to update the driver to the latest version. But sometimes you already have the latest version, then it’s also an option to install an older version of the driver.
Right-Click on the Start menu and choose Device Manager Expand the Display Adapter (assuming that the graphics card driver is the problem) and right click on your graphics card Choose Update Driver to start with
First try to search automatically for drivers. If a new driver is found install it and restart your computer. If you already have the best driver installed then close the update driver window Right-click again on your Graphics card and choose Properties Select the Driver tab and write down the Driver version.
Open the website of the manufacturer (see list in step 3 or use Google) and check if there is a newer driver version available for you Graphics Card. If there isn’t a newer version, then download a older version. In the properties screen click on Update Choose Browse my computer for drivers Select the driver that you have just downloaded. Restart your computer
Step 5 – Remove the faulty driver that causes System Thread Exception not Handled
Sometimes you can’t find another driver of the correct device to which the corrupted driver belongs to. We can still fix the system_thread_exception_not_handled error by removing the driver.
There are a couple of ways to do this. If you know the device to which the driver belongs, then uninstall the device in the device manager. Follow the steps in Step 4 to open the device manager and instead of update driver you choose Uninstall device.
If that doesn’t work then we can rename the driver file:
Open the explorer (Windows key + E) Navigate to C:\Windows\System32\Drivers Find the file that matches the name that we found in Step 3 Rename the file to .old
It’s possible that you can’t rename the file due to a permission error. We can still rename the file, but we will need to boot into Recovery mode for this.
Remove driver in Recovery mode
Use the steps described in Step 1 or in this article to restart Windows 10 into Recovery mode. Instead of Startup Settings make sure you select Command Prompt this time.
We are first going to list the drivers that are loaded by Windows, type the following and press enter:
DISM /Image:E:\ /Get-Drivers
Scroll through the list and find the file name that matches the faulty driver that we found in Step 3. Note the published name oemx.inf
Remove the driver with the following command, where you replace oem1.inf with the correct published name of your driver.
DISM /Image:E:\ /Remove-Driver /Driver:oem1.inf
Restart your computer and check if the problem is resolved.
Rename the driver file
If you are unable to find the driver with the DISM command then you can also rename the file through the command line.
Navigate to the driver’s folder:
cd e:\windows\system32\drivers
Rename the file, replace the file name with the name of the faulty driver.
ren Nvlddmkm.sys Nvlddmkm.old
Restart your computer by closing the command prompt windows and choose to Continue Windows 10. Check if the System Thread Exception not handled error resolved.
Step 6 – Repair your Sytem files
When the blue screen is caused by NTFS.sys or if you are unable to find a responsible driver, then we need to take a look at the system files. Corrupt system files can also cause the system_thread_exception_not_handled error.
Use the steps described earlier or from this article to start Windows 10 in recovery mode. Make sure you select Command Prompt from the recovery options or open Command Prompt in Safe mode (right-click start, choose command prompt or PowerShell)
First, we are going to repair any corrupt files in our Windows system image:
DISM.exe /Online /Cleanup-image /Restorehealth
When DISM is finished we can scan the system files and repair them if necessary:
sfc /scannow
Step 7 – Restore your Windows installation
When non of the steps above solved the System Thread Exception not Handled error on your computer then your last option is to restore your Windows 10 installation. Windows 10 has the option to keep your personal files, so in most cases, you won’t lose any data.
But always make sure you have a backup of your files before you start restoring your Windows installation.
The easiest way to repair Window 10 is with a recovery USB. I have described in this article how you can make one. Use the USB to restore your Windows installation.
Wrapping Up
The system_thread_exception_not_handled error can be a difficult error to fix, but it’s possible. If you can’t start Windows 10 in safe mode, then use a Windows 10 installation medium (see step 7) to start the recovery mode. This will allow you to open the command prompt and follow steps 5 and 6.
I hope this article helped you with solving the error. Please share it when you found it useful. If you have any questions, just drop a comment below.
Windows 10에서 “시스템 스레드 예외가 처리되지 않음” 오류 중지 코드를 수정하는 방법
시스템 스레드 예외가 처리되지 않음 오류는 BSOD 또는 죽음의 블루 스크린입니다. BSOD는 Windows 사용자 사이에서 시스템 오작동을 일으키는 무서운 블루 스크린입니다. BSOD는 드라이버가 제대로 작동하지 않는 것부터 전원 공급 장치 문제에 이르기까지 PC의 다양한 문제로 인해 발생할 수 있습니다. 시스템 스레드 예외가 처리되지 않음 BSOD는 매우 쉽습니다. 이 기사에서 이를 수행하는 방법을 보여드리겠습니다.
시스템 스레드 예외가 처리되지 않음 오류란 무엇입니까?
System Thread Exception Not Handled 일반적인 Windows 10 BSOD 또는 Blue Screen of Death입니다. 이 오류는 하나 이상의 이유로 인해 발생할 수 있으므로 다른 BSOD보다 더 복잡할 수 있습니다. 이 오류는 주로 Windows 10, 8.1 및 8에서 발생합니다. 그러나 다른 버전의 Windows에서는 나타날 수 있습니다.
시스템 스레드 예외가 처리되지 않는 원인은 무엇입니까?
ㅏ System Thread Exception Not Handled 오류는 하나 이상의 드라이버가 제대로 작동하지 않아 발생할 수 있으므로 문제를 일으키는 드라이버를 찾는 것이 중요합니다. 시스템 스레드 예외가 처리되지 않음 오류를 수정하려면 다음 단계를 따르십시오.
처리되지 않은 시스템 스레드 예외를 수정하는 방법(2021)
1. 안전 모드로 부팅하여 처리되지 않는 시스템 스레드 예외 수정
설정에서 안전 모드로 부팅
설정 열기 클릭 Update and Security 그런 다음 클릭 Recovery. 아래에 Advanced Startup 클릭 Restart Now. PC가 다시 시작되면 옵션 화면이 표시되어야 합니다. 이제 Troubleshoot > Advanced options > Startup Settings 그런 다음 클릭 Restart. 시스템이 재부팅될 때 F5 키를 누릅니다. press F5 컴퓨터를 부팅하려면 Safe Mode with Networking.
로그인 화면에서 안전 모드로 부팅
로그인 화면에서 Shift 키를 누른 상태에서 화면의 전원 버튼을 클릭합니다. 그런 다음 Restart. PC가 다시 시작되면 옵션 화면이 표시되어야 합니다. 이제 Troubleshoot > Advanced options > Startup Settings 그런 다음 클릭 Restart. 시스템이 재부팅될 때 F5 키를 누릅니다. press F5 컴퓨터를 부팅하려면 Safe Mode with Networking.
빈 화면에서 안전 모드로 부팅
Press and hold your power button for 10-15 seconds PC가 꺼질 때까지. 전원 버튼을 다시 눌러 전원을 켭니다. 제조사 로고가 나오면 press and hold the power button again for 10-15 seconds PC를 종료합니다. 이제 다시 켜십시오. PC는 다음으로 부팅해야 합니다. Windows Recovery Environment. 이제 4, 5, 6단계를 따르세요. Boot into Safe Mode from Settings
2. 이 문제에 대한 책임이 있는 드라이버를 찾는 방법
Malfunctioning drivers mostly cause the System Thread Exception Not Handled error. 오류를 일으키는 드라이브를 찾으려면 다음 단계를 따르십시오.
누르다 Windows + R 또는 시작 메뉴에서 실행을 엽니다. 대화 상자에서 다음을 입력합니다. eventvwr. 확장 Windows Logs 그리고 선택 System.
라는 로그를 찾아 클릭하십시오. system_thread_exception_not_handled 문제를 일으키는 드라이버를 확인합니다.
3. 드라이버 롤백, 업데이트 또는 재설치
오류를 일으킨 드라이버에 따라 드라이버를 롤백 또는 업데이트하거나 다시 설치해야 할 수 있습니다. 예를 들어 최근에 드라이버를 업데이트한 경우 오류가 발생하면 드라이버를 롤백해야 할 수 있습니다.
드라이버 롤백 방법
장치 관리자를 열고 문제를 일으키는 드라이버를 찾으십시오. 이제 드라이버 메뉴를 확장하고 드라이버를 마우스 오른쪽 버튼으로 클릭합니다. 이제 Properties, 아래의 Driver 탭 클릭 Roll back Driver
이제 Windows에서 드라이버를 사용 가능한 마지막 버전으로 자동 롤백합니다.
드라이버 업데이트 방법
장치 관리자를 열고 문제를 일으키는 드라이버를 찾으십시오. 이제 드라이버 메뉴를 확장하고 드라이버를 마우스 오른쪽 버튼으로 클릭합니다. 이제 Update Driver.
열리는 팝업 상자에서 다음을 선택합니다. Search automatically for updated driver software. 이제 Windows에서 사용 가능한 최신 버전의 드라이버를 자동으로 설치합니다.
드라이버 재설치 방법
장치 관리자를 열고 문제를 일으키는 드라이버를 찾으십시오. 이제 드라이버 메뉴를 확장하고 드라이버를 마우스 오른쪽 버튼으로 클릭합니다. 이제 Uninstall Device. 제조업체 웹 사이트에서 올바른 드라이버를 찾아 설치하고 실행합니다. 이제 PC를 다시 시작하십시오.
4. 결함이 있는 드라이버 또는 파일 이름 바꾸기
드라이버의 파일 이름을 검색하여 시스템 스레드 예외가 오류를 처리하지 못하게 한 후 드라이버의 이름도 변경해야 합니다. 이렇게 하면 Windows에서 새 복사본을 만들고 다시 설치합니다. 파일 이름을 변경하려면 다음 단계를 따르십시오.
열려있는 File Explorer 로 이동 C:WindowsSystem32drivers. 결함이 있는 드라이버를 찾으십시오. 마우스 오른쪽 버튼으로 클릭하고 선택 Rename. 파일 확장자를 다음으로 바꾸십시오. .old. Enter 키를 누르고 컴퓨터를 다시 시작합니다.
5. SFC 또는 DISM을 사용하여 시스템 파일 복구
SFC(시스템 파일 검사기) 및 DISM(배포 이미지 서비스 및 관리)은 모든 Windows 사용자가 사용할 수 있는 도구이며 거의 모든 시스템 관련 오류를 수정하는 데 사용할 수 있습니다. SFC 및 DISM을 사용하여 시스템 파일을 복구하는 방법은 다음과 같습니다.
광고. 계속 읽으려면 스크롤하세요.
SFC 사용
시작 메뉴에서 명령 프롬프트를 검색하여 관리자 권한으로 실행합니다. 유형 sfc /scannow 그리고 엔터를 누릅니다.
이제 Windows에서 손상된 시스템 파일을 검색합니다.
DISM 사용
시작 메뉴에서 명령 프롬프트를 검색하여 관리자 권한으로 실행합니다. 유형 DISM /Online /Cleanup-Image /ScanHealth Enter 키를 누릅니다.
Windows가 스캔을 완료한 후 다음을 입력합니다. DISM /Online /Cleanup-image /RestoreHealth Enter 키를 누릅니다. Windows는 스캔 중에 발견된 모든 문제를 자동으로 복구합니다.
6. 시스템 복원을 사용하여 PC 복원
시스템 복원을 사용하여 PC를 복원하는 방법
시작 메뉴에서 제어판을 입력하고 엽니다. 검색창에 입력 Recovery 클릭하여 엽니다. 이제 Open System Restore. 다음을 클릭하고 다음을 선택하십시오. Restore Point.
이제 Finish.
시스템 스레드 예외가 성공적으로 처리되었습니다.
시스템 스레드 예외가 처리되지 않은 BSOD를 수정하는 다양한 방법이었습니다. 안전 모드로 부팅하는 것은 약간 까다로울 수 있으며 제대로 하려면 약간의 시도가 필요할 수 있습니다. 이 과정을 마치면 나머지 프로세스는 간단하며 즉시 PC를 가동할 수 있습니다. 두 개의 드라이버가 오류를 일으키는 경우 약간 까다로울 수도 있습니다. 그렇다면 위의 단계에 따라 두 드라이버를 모두 수정해야 합니다. 위에 제공된 팁은 시스템 서비스 예외 오류와 같은 다른 문제를 수정하는 데에도 유용합니다.
시스템 서비스 예외 오류에 대한 다른 수정 사항이 있는 경우 아래 설명에 이에 대해 작성할 수 있습니다.
처리되지 않은 시스템 스레드 예외에 대해 자세히 알아보기 여기
Read More Like This:
시스템 스레드 예외가 처리되지 않는 BSOD를 수정하는 방법
윈도우 10 System Thread Exception Not Handled BSOD(죽음의 블루 스크린) 오류는 결함이 있거나 사용되지 않거나 손상된 장치 드라이브와 관련이 있습니다. 대부분의 경우 정지 코드(보통 0x0000007E 또는 0x1000007E) 문제를 해결하기가 상당히 쉽습니다. 특정 드라이버를 업데이트하거나 롤백하기만 하면 오류가 다시 발생하지 않습니다.
그러나 드물게 문제를 해결하기 위해 몇 가지 고급 수정 작업을 수행해야 할 수도 있습니다. 그러나 시작하기 전에 이면에 있는 문제가 있는 장치 드라이버를 식별해야 합니다. System Thread Exception Not Handled BSOD.
문제가 있는 드라이버 식별
당신이 부딪힐 때마다 System Thread Exception Not Handled BSOD 오류가 발생하면 바로 옆에 나열된 실패한 시스템(.sys) 드라이버 파일이 표시됩니다. 오류를 유발하는 여러 드라이버는 다음과 같습니다.
nvlddmkm.sys — NVIDIA 그래픽 드라이버
— NVIDIA 그래픽 드라이버 igdkmd64.sys — 인텔 그래픽 드라이버
— 인텔 그래픽 드라이버 atkimpag.sys — AMD 그래픽 드라이버
— AMD 그래픽 드라이버 hidclass.sys — 마우스 또는 키보드 드라이버
— 마우스 또는 키보드 드라이버 acpi.sys — Windows ACPI 드라이버
— Windows ACPI 드라이버 rtkvhd64.sys — Realtek 오디오 드라이버
— Realtek 오디오 드라이버 syntp.sys — Synaptics 터치패드 드라이버
— Synaptics 터치패드 드라이버 tcpip.sys — 네트워크 카드 드라이버
— 네트워크 카드 드라이버 usbxhci.sys — USB 드라이버
의 사진을 찍어 System Thread Exception Not Handled 다음에 발생할 때 BSOD 화면. 그런 다음 (다소 애매한) 시스템 드라이버 파일 이름으로 온라인 검색을 수행하여 연결된 장치 드라이버를 식별합니다.
Windows 10이 실행될 때까지 기다릴 수 없다면 System Thread Exception Not Handled 다시 오류가 발생하면 무료로 다운로드하여 실행하십시오. 블루스크린뷰 Nirsoft의 애플릿. BSOD 덤프 파일을 자동으로 분석하고 문제를 일으키는 드라이버 파일을 릴레이합니다.
만약 System Thread Exception Not Handled BSOD는 특정 드라이버 파일을 나타내지 않고 표시되지만 그래픽 및 오디오와 같은 구성 요소와 관련된 드라이버를 업데이트, 롤백 또는 다시 설치하려면 이어지는 문제 해결 팁을 사용하는 것이 좋습니다.
장치 드라이버 업데이트
그만큼 System Thread Exception Not Handled BSOD 오류는 일반적으로 비디오 카드와 관련된 것과 같은 오래된 하드웨어 드라이버에서 발생합니다.
장치 제조업체의 웹 사이트로 이동하여 해당 장치의 최신 드라이버를 다운로드합니다. 그런 다음 실행 파일을 실행하여 드라이버를 업데이트합니다.
특정 장치 드라이버를 온라인에서 찾는 데 문제가 있는 경우 드라이버 업데이트 도구를 사용하여 절차를 자동화할 수 있습니다.
Windows 10 업데이트 설치
최신 Windows 10 업데이트에는 PC를 사용하는 동안 발생하는 버그 및 문제에 대한 다양한 수정 사항이 포함될 뿐만 아니라 하드웨어 드라이버 업데이트도 함께 제공됩니다. 설치해야 합니다.
1. 열기 Start 메뉴를 선택하고 Settings.
2. 고르다 Update & Security 그리고 선택 Check for updates 새 업데이트 검색을 시작합니다.
3. 선택 Download and install Windows 10을 업데이트하고 View all optional updates 하드웨어 드라이버 업데이트를 선택하고 설치합니다.
장치 드라이버 롤백
새 드라이버 업데이트로 인해 문제가 발생할 수도 있습니다. 만약 System Thread Exception Not Handled 장치를 업데이트한 직후 BSOD 오류가 표시되었으므로 롤백해야 합니다.
1. 누르다 Windows + X 레이블이 지정된 옵션을 선택합니다. Device Manager.
2. 롤백할 장치를 찾아 마우스 오른쪽 버튼으로 클릭합니다. 예를 들어 igdkmd64.sys 나란히 System Thread Exception Not Handled 오류가 발생하면 Intel 그래픽 카드를 선택해야 합니다.
3. 선택 Properties.
4. 전환 Driver 탭.
5. 선택 Roll Back Driver.
장치 드라이버 삭제 및 재설치
드라이버를 업데이트하거나 롤백해도 도움이 되지 않으면 대신 다시 설치해야 합니다. 그것은 배제하는 데 도움이되어야합니다 System Thread Exception Not Handled 손상된 하드웨어 드라이버로 인한 BSOD.
1. 누르다 Windows + X 그리고 선택 Device Manager.
2. 삭제할 장치 드라이버를 마우스 오른쪽 버튼으로 클릭합니다.
3. 선택 Uninstall device.
4. 옆의 확인란을 선택합니다. Delete the driver software for this device (이러한 옵션이 표시되는 경우) 선택하고 Uninstall.
5. 컴퓨터를 다시 시작합니다.
운영 체제는 장치 드라이버를 자동으로 다시 설치해야 합니다. 제조업체 웹 사이트에서 최신 드라이버를 다운로드하여 적용하여 업데이트하십시오.
손상된 파일 및 드라이브 오류 복구
위의 수정 사항 중 아무 것도 작동하지 않으면 시스템 파일 검사기, DISM(배포 이미지 서비스 및 관리) 도구 및 디스크 검사 유틸리티를 사용하여 Windows 10에서 손상된 파일 및 디스크 오류를 확인하고 복구할 수 있습니다.
관리자 권한 Windows PowerShell 콘솔을 통해 세 가지 도구를 모두 실행할 수 있습니다. 누르다 Windows + X 그리고 선택 Windows PowerShell (Admin) 관리자 권한으로 PowerShell을 엽니다.
시스템 파일 검사기 실행
시스템 파일 검사기는 Windows 10에서 손상된 시스템 파일을 수정합니다. 다음 명령으로 실행합니다.
sfc /scannow
DISM 도구 실행
DISM 도구는 Windows 10의 안정성 문제를 수정합니다. 아래 세 가지 명령을 차례로 실행합니다.
DISM /Online /Cleanup-Image /CheckHealth
DISM /Online /Cleanup-Image /ScanHealth
DISM /Online /Cleanup-Image /RestoreHealth
디스크 검사 유틸리티 실행
디스크 검사 유틸리티는 드라이브 오류를 복구합니다. 다음 명령으로 실행하십시오.
chkdsk c: /r
시스템 복원 사용
수정 가능한 또 다른 방법 System Thread Exception Not Handled BSOD는 운영 체제를 이전 상태로 복원하는 것입니다. 그러나 그렇게 하려면 이전에 Windows 10에서 시스템 복원을 설정했어야 합니다.
1. 누르다 Windows + S유형 system protection선택 Open.
2. 로 전환 System Protection 탭하고 선택 System Restore.
3. 시스템 복원 마법사의 지시에 따라 Windows 10을 특정 복원 지점으로 되돌립니다.
Windows 10 재설정
당신은 여전히 계속 실행합니까 System Thread Exception Not Handled BSOD?
Windows 10을 공장 기본값으로 재설정하여 오류 이면의 근본적인 문제를 제거할 수 있습니다. 운영 체제를 처음부터 다시 설치하는 것과 다소 비슷하지만 원하는 경우 개인 파일을 그대로 유지하도록 선택할 수 있습니다.
1. 열기 Settings Windows 10의 앱.
2. 선택 Update & Security.
3. 전환 Recovery 사이드탭.
4. 선택하다 Get started.
5. 화면의 지시에 따라 PC를 초기화합니다.
시스템 스레드 예외 처리됨
위의 수정 사항은 문제를 해결하는 데 도움이되었을 가능성이 큽니다. System Thread Exception Not Handled 컴퓨터의 BSOD 오류. 그렇지 않은 경우 수행할 수 있는 몇 가지 다른 작업이 있습니다.
컴퓨터의 BIOS를 업데이트하십시오.
오버클럭된 구성 요소(예: GPU)를 기본값으로 설정합니다.
Windows 10을 완전히 다시 설치합니다.
메모리 진단을 실행합니다.
컴퓨터 내부의 하드웨어를 청소하십시오.
그래도 문제가 해결되지 않으면 하드웨어 구성 요소에 결함이 있는 것일 수 있습니다. 도움이 필요하면 가까운 PC 수리 서비스에 문의하십시오.
FIX: SYSTEM THREAD EXCEPTION NOT HANDLED
SYSTEM THREAD EXCEPTION NOT HANDLED is an error which appears on a Blue Screen of Death (BSOD) when process threads running critical windows services fault. It has been mainly reported by users of Windows 8, 8.1 and 10. While some users get 10 to 15 seconds before they get this error, some have reported immediately getting this error after their windows start, and then their systems reboots, getting stuck in a loop making it impossible for them to use any computer.
This error mainly occurs due to a driver malfunction. An outdated, corrupted or incompatible driver can get your system into display this blue screen. Outdated drivers and overclocking softwares, or a recently overclocked tweak are also known to cause this BSOD. If a recently installed program or a driver caused this issue; then the first approach should be to uninstall them since they are simply not compatible, keep track of updates and attempt reinstall when a patch or update to the driver has been released.
You can do this by booting into Safe Mode. (see below)
What to do to Fix the SYSTEM_THREAD_EXCEPTION_NOT_HANDLED Error
Analyse the Minidump Files
This BSOD has several variations, it is best to analyse the minidump file which is responsible for logging the crashes and can provide more details on what exactly is causing the SYSTEM THREAD EXCEPTION BSOD.
In order to continue with this, please see steps below.
Right-click on This PC, and then click on Properties.
Click the Advanced tab, and then under Startup and Recovery, click Settings (or Startup and Recovery).
Under System Failure, click to select the check boxes for the actions that you want Windows to perform if a system error occurs:
The Write an event to the System log option specifies that event information is recorded in the System log. By default, this option is turned on. To turn off this option by modifying the registry, type the following information at a command prompt, and then press ENTER:
wmic recoveros set WriteToSystemLog = False
The Send an administrative alert option specifies that administrators are notified of the system error if you configured administrative alerts.. To turn off this option by modifying the registry, type the following information at a command prompt, and then press ENTER:
wmic recoveros set SendAdminAlert = False
The Automatically restart option specifies that Windows automatically restarts your computer. By default, this option is enabled. To turn off this option by modifying the registry, type the following information at a command prompt, and then press ENTER:
wmic recoveros set AutoReboot = False
Under Write Debugging Information, select the type of information that you want Windows to record in a memory dump file if the computer stops unexpectedly:
The Small Memory Dump option records the smallest amount of information to help identify the problem. To specify that you want to use a small memory dump file by modifying the registry, type the following information at a command prompt, and then press ENTER:
wmic recoveros set DebugInfoType = 3
To specify that you want to use the D:\Minidump folder as your Small Dump Directory by modifying the registry, set the MinidumpDir Expandable String Value to D:\Minidump. For example, type the following information at a command prompt, and then press ENTER:
wmic recoveros set MiniDumpDirectory = D:\Minidump
The Kernel Memory Dump option records only kernel memory. This option stores more information than a small memory dump file, but it takes less time to complete than a complete memory dump file.
There are other options as well but we recommend you use the Small Memory Dump option as it’s small in size but it still contains enough information for you to solve your issue. Additionally, you will need to use this option in order to read and open the minidump file properly.
Let’s find out just how to open and read the minidump file. You will need to download a certain tool made available by Microsoft. Firstly, it was a part of the Debugging Tools for Windows but Microsoft decided to create a standalone package.
Visit here in order to download Windows Driver Kit. You can also download WinDbg as a standalone package which is actually the only tool you will need.
Download the installer and follow the instructions on screen in order to install it properly.
Click Start, click Run, type cmd, and then click OK. Change to the Debugging Tools for Windows folder. To do this, type the following at the command prompt, and then press ENTER:
cd c:\program files\debugging tools for windows
To load the dump file into a debugger, type one of the following commands, and then press ENTER:
windbg -y SymbolPath -i ImagePath -z DumpFilePath
kd -y SymbolPath -i ImagePath -z DumpFilePath
If you decided to save the file in the C:\windows\minidump\minidump.dmp folder, you can use the following sample command:
windbg -y srv*c:\symbols*http://msdl.microsoft.com/download/symbols -i c:\windows\i386 -z c:\windows\minidump\minidump.dmp
Check the file for any errors and bugs related to system files and make sure you google each file next to the error message to make sure it’s a driver or a part of a certain third-party app.
if after analysing dump files you were able to figure out the issue, then most likely it is now resolved but if not then you proceed with these methods below.
Check Display Drivers
Display drivers are one of the most common reason for this error to occur. We will uninstall them and then re-install the latest version of the display drivers. If you can log in to Windows for even a few minutes then skip to Step 2. But if you can’t even log in to Windows then start with Step 1.
Step 1: Boot into Safe Mode
In safe mode, your drivers and services are disabled which are not necessary to run Windows. To boot Windows 8/8.1 and 10 into safe mode, turn your system on and force it to shut down by pressing the power button, turn it back on and repeat the steps until the system starts in repair mode. (you may need to repeat this for 4 to 5 times). The aim is to somehow trigger and push your system to go into repair/advanced mode.
Click on Troubleshoot > Advanced options > Command Prompt. A black command prompt window will appear. Now type the following command and press Enter.
BCDEDIT /SET {DEFAULT} BOOTMENUPOLICY LEGACY
Now type Exit and press Enter. Click Continue.
Now restart your system and keep tapping F8 (Shift + F8 for some) before the Windows logo appear. Advanced Boot Options menu will appear. In it highlight Safe Mode with Networking and press Enter. Now log in. You will be running your Windows in Safe Mode now.
If for some reason you can’t get the recovery options to show up, then get an installation media of your Windows operating system, which can be either a DVD or make a bootable USB through Media Creation tool. You will need an 8 GB USB and a computer with internet access.
To create a Windows 10 Bootable USB Installation media, follow our guide on this link.
To create a Windows 8.1 Bootable USB Installation media, go to this link. Scroll down and click on Download Tool Now. Run the tool and follow the onscreen instructions.
Enter the DVD or insert the USB into the target computer. Power on and keep tapping F2 to access Boot menu. The button to enter boot menu may differ by your system’s model. Normally, for Dell it is F12, for HP it is F9. You may have to check your system’s manufacturer’s website for yours.
After accessing the boot menu, highlight and select CD/DVD if you inserted a DVD, or select USB drive if you inserted a USB.
If you are asked to press any key to boot from the media do so. Click Next if the time zone, keyboard layout preference and language are fine for you.
Now in the lower left corner, click on Repair your computer.
Now follow the above given method to open command prompt and get into safe mode.
Step 2: Uninstall Display Drivers
Hold down Windows key and press R. In the Run dialog, type devmgmt.msc and press Enter.
Device manager window will appear. In it, double click Display adapters to expand it. Under it will be your graphic card installed. (write down the full name of your display driver, before uninstalling it) once done, Right click on it, and chose Uninstall.
Then click Delete the driver software for this device and click OK. Restart your system normally. After restarting, video drivers will get installed automatically. If not, or if you are having the same issue again, then you will have to install the updated version of the drivers manually. Follow step 3 to see how.
Step 3: Install/Update Drivers
To get an updated version of drivers for your graphic card, visit your graphic card manufacturer’s website. Search by the card’s model and download the appropriate drivers compatible with your operating system and system type (x64 or x86). To know them both, hold Windows key and press R, type msinfo32 and press Enter.
In the system information window, note down OS type and System type in the right pane. The downloaded files will probably be an executable. Simply run it and follow the onscreen instructions.
If you don’t have an external graphic card installed, then you will have a integrated display adapter embedded on your motherboard. Visit your motherboard’s manufacturers website (The one whose logo splashes when you power on your system) to get updated drivers for your onboard graphic adapter. In addition to operating system and system type, you will also need your system model, which is also mentioned in the System Information window. The downloaded file here will also be an executable. Simply run it and follow the onscreen instructions.
Uninstall Your Sound Card Drivers
Sometimes this error message is caused by a faulty driver called C-Media USB Audio Class 1.0 and 2.0 DAC Device Driver which can be found with some Xerox sound cards. Updating the driver may not fix the issue properly so you might try uninstalling the driver completely and letting the Device Manager replace it with the default sound card driver.
Click Start and type Run. Select Run, A Run dialog box will appear. Type “devmgmt.msc” in the run box and click OK button. This is to open Device Manager Window. In Device Manager, expand category “Sound, video and game controllers“. Under this category, right-click on anything related to C-Media USB Audio Class 1.0 and 2.0 DAC Device Driver. A context menu will pop up. Then select Uninstall device.
You may be required to confirm the uninstallation. Check the box next to “Delete the driver software for this device” and click OK button. Restart your PC for the change to take effect. After restarting, Windows will attempt to reinstall the driver and replacing it with the manufacturer’s driver. If Windows doesn’t replace the sound card driver, open Device Manager again, select Action and click on the Scan for hardware changes option.
Rename the Faulty Driver
If next to SYSTEM THREAD EXCEPTION NOT HANDLED, you can see a file name such as atikmdag.sys, nvlddmkm.sys, etc.. in a bracket, then we can rename the culprit driver into something that the windows can’t find, hence it will fetch a new copy of the driver file.
Get into the command prompt through steps shown in first solution.
In the black window, type the following commands, and press Enter after each.
c: dir
If the results of the dir command shows a folder named “Windows” then it is the target drive. If not, type d: and press Enter.
Now type the following commands and press Enter after each line.
cd windows\system32\drivers ren drivername.sys drivername.old
In the above command, drivername is the name of the fault driver, e.g atikmdag.sys.
Restart your system. The driver we deleted will be installed automatically. If not, log in normal mode, hold Windows key and press R. Type devmgmt.msc and press Enter.
The uninstalled device driver will have a yellow exclamation mark. Right click on it and click Update Driver Software.
Click Search automatically for Updated Driver Software. Windows will search for the driver online and install it once it finds it
Reset your PC
Resetting our PC is considered to a last resort for this issue but it is definitely efficient and it’s able to fix most of the BSOD issues, including the one described in this article. Here’s how to reset your PC in Windows 10.
Navigate to Settings. You can get there by clicking the gear icon on the Start menu.
Select “Update & security” and click Recovery in the left pane.
Windows presents you with three major options: Reset this PC, Go back to an earlier build and Advanced startup. Reset this PC is the best option for starting fresh. Advanced startup lets you boot off a recovery USB drive or disc and “Go to an earlier build” is made for Windows Insiders who want to roll back to a previous version of the OS. Click Get started under Reset this PC.
Click either “Keep my files” or “Remove everything,” depending on whether you want to keep your data files intact. Either way, all of your settings will return to their defaults and apps will be uninstalled. Select “Just remove my files” or “Remove files and clean the drive” if you chose to “remove everything” in the prior step. Cleaning the drive takes a lot longer but will make sure that, if you are giving the computer away, the next person will have a hard time recovering your erased files. If you are keeping the computer, choose “Just remove my files.”
Click Next if Windows warns you that you won’t be able to roll back to a prior version of the OS. Click Reset when prompted.
키워드에 대한 정보 system thread exception not handled 블루 스크린
다음은 Bing에서 system thread exception not handled 블루 스크린 주제에 대한 검색 결과입니다. 필요한 경우 더 읽을 수 있습니다.
이 기사는 인터넷의 다양한 출처에서 편집되었습니다. 이 기사가 유용했기를 바랍니다. 이 기사가 유용하다고 생각되면 공유하십시오. 매우 감사합니다!
사람들이 주제에 대해 자주 검색하는 키워드 Windows 10에서 \”시스템 스레드 예외가 처리되지 않음\” 오류를 수정하는 방법
- howto
- diy
- tech
- tips
- windows
- reviewsed
Windows #10에서 #\”시스템 #스레드 #예외가 #처리되지 #않음\” #오류를 #수정하는 #방법
YouTube에서 system thread exception not handled 블루 스크린 주제의 다른 동영상 보기
주제에 대한 기사를 시청해 주셔서 감사합니다 Windows 10에서 \”시스템 스레드 예외가 처리되지 않음\” 오류를 수정하는 방법 | system thread exception not handled 블루 스크린, 이 기사가 유용하다고 생각되면 공유하십시오, 매우 감사합니다.