당신은 주제를 찾고 있습니까 “adb apk installer – How to force install any apk using adb“? 다음 카테고리의 웹사이트 https://hu.taphoamini.com 에서 귀하의 모든 질문에 답변해 드립니다: https://hu.taphoamini.com/photos/. 바로 아래에서 답을 찾을 수 있습니다. 작성자 Me Technophile 이(가) 작성한 기사에는 조회수 62,422회 및 좋아요 440개 개의 좋아요가 있습니다.
Table of Contents
adb apk installer 주제에 대한 동영상 보기
여기에서 이 주제에 대한 비디오를 시청하십시오. 주의 깊게 살펴보고 읽고 있는 내용에 대한 피드백을 제공하세요!
d여기에서 How to force install any apk using adb – adb apk installer 주제에 대한 세부정보를 참조하세요
adb apk installer 주제에 대한 자세한 내용은 여기를 참조하세요.
Install an apk file from command prompt? – Stack Overflow
Use adb install -r example.apk to install/update an app. The -r will update the app if it’s already installed. – ben_joseph.
Source: stackoverflow.com
Date Published: 10/1/2021
View: 5227
How to Install APK Using ADB Commands – TechCult
How to Use ADB to install APK on your device? · 1. The first thing that you need to do is move the APK file to the folder containing the SDK platform tools. · 2.
Source: techcult.com
Date Published: 6/18/2021
View: 4126
Download ADB Installer 1.0 – Cài đặt các ứng dụng Android APK
Ứng dụng ADB Installer hỗ trợ các nhà phát triển Andro và các đối tượng người dùng thông thường cài đặt các ứng dụng Andro APK- Thủ …
Source: taimienphi.vn
Date Published: 10/7/2022
View: 6781
How to install ADB to install APK files – VR TOURVIEWER
INSTALL AN APK FILE · Connect your VR device to your computer using a USB cable · Wear your VR headset and confirm if a question is shown to allow the connection …
Source: www.vrtourviewer.com
Date Published: 3/14/2022
View: 3283
[TOOL][ADB][Windows]APK Installer For Multiple-User Android …
Hi all, wrote a small Windows command script to install APKs … [TOOL][ADB][Windows]APK Installer For Multiple-User Andro System [NO ROOT].
Source: forum.xda-developers.com
Date Published: 1/15/2021
View: 5326
ADB Install Apk v1.6.0 Download For Android – APKBigs.com
ADB install apk application proves users with the ability to debug their andro by making use of the andro debug Brge command line tool.
Source: apkbigs.com
Date Published: 7/9/2022
View: 8181
Tải về APK Local ADB (Android 11+) Android 1.2.4 mới nhất
Tải về và cài đặt APK Local ADB (Andro 11+) Andro 1.2.4 mới nhất. adb client để kết nối localhost. … Fast and safe XAPK / APK installer.
Source: m.apkpure.com
Date Published: 7/25/2022
View: 1092
Android Debug Bridge (adb) – Android Developers
Install an app. You can use adb to install an APK on an emulator or connected device with the install command:.
Source: developer.android.com
Date Published: 12/2/2022
View: 2804
How to Install APK Using ADB Commands – Techilife
How to Install APK Using ADB Commands · “ADB installs -r Source: www.techilife.com Date Published: 7/14/2021 View: 4893 Install APK Using ADB Commands … Now open a command prompt in the ADB folder by holding the Shift key and Right Click in the empty space in the … Source: www.droidviews.com Date Published: 7/16/2022 View: 6057 주제와 관련된 더 많은 사진을 참조하십시오 How to force install any apk using adb. 댓글에서 더 많은 관련 이미지를 보거나 필요한 경우 더 많은 관련 기사를 볼 수 있습니다. You can use the code below to install application from command line adb install example.apk this apk is installed in the internal memory of current opened emulator. adb install -s example.apk this apk is installed in the sd-card of current opened emulator. You can also install an apk to specific device in connected device list to the adb. adb -s emulator-5554 install myapp.apk Refer also to adb help for other options. When you consider installing an app on your Android smartphone, what is the first thing that comes to your mind? Google Play Store, right? Downloading and installing an app from the Play Store is the simplest and easiest method to do so. However, it most certainly isn’t the only method. Well, for starters, you always have the option to install apps from their APK files. These files are like setup files for software that can be downloaded using a web browser like chrome and then installed as and when required. The only requirement is that you enable the Unknown Sources permission for your browser. Now, the described method requires you to have direct access to your device but consider a situation where accidentally some system file gets damaged. This causes your UI to crash and leaving you with no way to access your phone. The only way to resolve the issue is to install a third-party UI app so that the device starts working again. This is where ADB comes in. It allows you to control your device using a computer. It is the only way in which you can install apps on your device in a situation like this. Well, this is just one of many scenarios where ADB could be a lifesaver. Therefore, it would only do you good if you knew more about ADB and learned how to use it and that’s exactly what we are going to do. We are going to discuss what is ADB and how it works. We will also take you through the various steps involved in the process of setting up and then using ADB to install apps on your device. How to Install APK Using ADB Commands What is ADB? ADB stands for Android Debug Bridge. It is a command-line tool that is a part of the Android SDK (Software Development Kit). It allows you to control your Android smartphone using a PC provided that your device is connected to the computer via a USB cable. You can use it to install or uninstall apps, transfer files, get information about network or Wi-Fi connection, check battery status, take screenshots or screen recording and so much more. It has a set of codes that allow you to perform various operations on your device. As a matter of fact, ADB is a very powerful tool that is capable of performing advanced operations that a good amount of practice and training to master. The more you explore the world of coding, the more useful ADB will become for you. However, for the sake of keeping things simple, we are just going to cover some basics and mainly teach you how to install an APK using ADB. How does it work? ADB uses USB debugging to take control of your device. When connected to a computer using a USB cable, ADB client is able to detect the connected device. It uses a command line or command prompt as the medium to relay the commands and information between the computer and the Android device. There are special codes or commands which allow you to control the processes and operations on your Android device. What are the various Pre-requisites for using ADB? Now, before you can install APK using ADB commands, you need to make sure the following pre-requisites are met. 1. The first thing that you need is to make sure that the device’s driver is installed on your PC. Every Android smartphone comes with its own device driver that automatically gets installed when you connect your phone to your PC. If your device does not have one then you need to download the driver separately. For Google devices like Nexus, you can find just install Google USB Driver which is a part of SDK (we will discuss this later). Other companies like Samsung, HTC, Motorola, etc. provide drivers on their respective sites. 2. The next thing that you need is to enable USB debugging on your Android smartphone. The option to do so can be found under Developer options. First, enable the Developer Options from the Settings menu. After that, you need to enable USB debugging from the Developer options. a. Open Settings and click on the System option. b. Now, tap on Developer options. c. Scroll down and under the Debugging section, you will find the setting for USB debugging. Simply toggle on the switch and you are good to go. 3. Last but not least, you need to download and install ADB on your computer. We will discuss this in the next section and guide you through the entire installation process. How to Download and Install ADB on Windows? As mentioned earlier, ADB is a part of the Android SDK and thus, you need to download the entire setup package for the tool kit. Follow the steps given below to download and install ADB on Windows 10: 1. Click here to go to the downloads page for Android SDK platform tools. 2. Now, click on the “Download SDK Platform-Tools for Windows” button. You can select the other options as well depending upon the operating system that you are using. 3. Agree to the Terms and Conditions and click on the Download button. 4. Once the zip file is downloaded, extract it at a location where you want to save the tool kit files. You will be able to see the ‘ADB’ present in the folder along with other tools. The installation process is now complete. We will now be moving to the next step that is using ADB to install APK on your device. How to Use ADB to install APK on your device? Before you proceed to install APK using ADB commands, you need to make sure that ADB is set up properly and the device connected is being detected properly. 1. To do this, connect your Android device to the computer and then open the folder containing the SDK platform tools. 2. In this folder, hold down Shift and then right-click. From the menu select the “Open Command window here” option. If the option to open the command window is not available, then click on the “Open PowerShell window here”. 3. Now, in the Command Prompt window/PowerShell window type the following code: “.\adb devices” and press Enter. 4. This will display the name of your device in the command window. 5. If it does not, then there is a problem with the device’s driver. 6. There is a simple solution to this problem. Go to the search bar on your computer and open Device Manager. 7. Your Android device will be listed there. Right-click on it and simply tap on the update driver option. 8. Next, click on the option to look for Drivers online. If there are any new drivers available then they will automatically get downloaded and installed on your computer. 9. Now, go back to command prompt/PowerShell window and type the same command provided above and press Enter. You will now be able to see the name of the device displayed on the screen. This confirms that ADB has been successfully set up and your device is connected properly. You can now perform any operations on your phone using the ADB commands. These commands need to be entered in the Command Prompt or PowerShell window. In order to install an APK on your device via ADB, you need to have the APK file stored on your computer. Let us assume that we are installing the APK file for the VLC media player. Follow the steps given below to install the app on your device: 1. The first thing that you need to do is move the APK file to the folder containing the SDK platform tools. This will make it easier as you would not have to type the entire path for the location of the APK file separately. 2. Next, open the command prompt window or PowerShell window and type in the following command: “adb install 3. Once the installation is complete, you will be able to see the message “Success” displayed on your screen. Recommended: Thus, you have now successfully learned how to install APK using ADB commands. However, as mentioned above ADB is a powerful tool and can be used to perform various other operations. All that you need to know is the correct code and syntax and you will be able to do so much more. In the next section, we have a little bonus for you. We will be listing down certain selected important commands that you can try and have fun experimenting with. Other Important ADB Commands 1. “adb install -r 2. “adb install -s 3. “adb uninstall 4. “adb logcat” – This command allows you to view the device’s log files. 5. “adb shell” – This command allows you to open an interactive Linux command-line shell on your Android device. 6. “adb push 7. “adb pull /sdcard/ 8. “adb reboot” – This command allows you to restart your device. You can also select to boot your device in bootloader by adding -bootloader after reboot. Some devices also allow you to directly boot into Recovery mode by typing “reboot recovery” instead of simply reboot. Copyright TAIMIENPHI.VN © 2018 – All rights reserved Mùa hè tới rồi muốn so sánh giá tìm điều hòa giá rẻ nhất thị trường hãy dùng TopGia để so sanh gia có nhiều mẫu dieu hoa để so sanh sanh, xem dieu hoagiá rẻ để so sánh giá ADB (Android Debugging Bridge) can be used to execute commands on your VR device. It’s mostly used to install applications (APK files) from a Windows PC or Mac with a device connected with USB. Windows Download and install Android Platform Tools Go to Start Menu , search for CMD , right-click and open as Administrator , search for , right-click and open as Administrator In the Command Prompt, type the following to test if installation was successful: adb help TIP: if you get a message along the lines of “adb is not a recognized command”, then cd to the installation folder of ADB (C:\Users\YOURUSERNAME\AppData\Local\Android\sdk\platform-tools), after which you can use adb.exe instead of adb in your commands Mac Open Terminal (click the search icon in the top-right corner of your Mac, type “terminal”, and press ENTER) (click the search icon in the top-right corner of your Mac, type “terminal”, and press ENTER) Install Homebrew by typing the following command into the Terminal window, press ENTER to execute the command: ruby -e “$(curl -fsSL https://raw.githubusercontent.com/Homebrew/install/master/install)” Install Android Platform Tools, which contains ADB, using Homebrew* by typing the following command in your Terminal: brew cask install android-platform-tools Test if installation succeeded by typing the following in your Terminal: adb help * Alternatively you could also install Android Platform Tools from the Android website, but then you might have to use the full path to the adb executable in the command line instead INSTALL AN APK FILE After you successfully installed ADB, you are now ready to install your APKs. Connect your VR device to your computer using a USB cable Wear your VR headset and confirm if a question is shown to allow the connection Check if ADB recognizes the device: adb devices If you don’t see any devices listed in the output, turn off your device, disconnect the USB, power your device back on, reconnect the USB and then run the command again If you see a device ID show up in the output with “unauthorized” behind it, enable ‘Developer Mode’ and “USB Debugging’ on your device. For Oculus devices, put your headset on and give permission. If you see a device ID show up with “device” behind it, you are good to go and ready for the next step Run the installation command: adb install -r /path/to/your-filename.apk The -r option is added to make sure you can also install an update to an existing app Attention: replace the “/path/to/your-filename.apk” in the command above with the actual path to your .apk file on your computer. On Mac, you can simply drag & drop the .apk in the Terminal window to find out the correct file path. On Windows, if you’ve placed the apk file on your desktop, you can use the path %USERPROFILE%\Desktop\ adb install -r %USERPROFILE%\Desktop\your-filename.apk Congrats, you just installed your APK! This process seems cumbersome, and it kinda is, but once you have everything setup, all you really need to do is run adb install (or adb install -r if you are updating an existing app) and you’re done. TIP: to uninstall an app, use adb uninstall *package name*. For example, adb uninstall com.headjack.myapp (this package name is shown behind the app name in the list of Unknown Sources in your Library). APK-Installer-For-Multiuser-ROMs MediaFire is a simple to use free service that lets you put all your photos, documents, music, and video in a single place so you can access them anywhere and share them everywhere. Hi all,wrote a small Windows command script to install APKs – provided with this tool – per user on a multiple-user Android system.Requirement:Android device with1. Android 9 and higher2. ADB enabledUsage:Download the .ZIP-file from link given below, extract the archive to any location of your Windows computer, feed the subfoldernamed APK-repository with APKs of your choice, establish an ADB-connection with your Android device, run Windows commandscript what is namedDL:Important:This script is “AS IS”. If bugs found, let it me know here. ADB Install Apk v1.6.0 Download For Android APK Bigs – Sep 01, 2021 4.72 57 votes Information of ADB install apk App Name ADB install apk Compatible with 1.0 and up Latest Version v1.6.0 Get it On com.adrionics.android.adbmaster.installer.free Price Free Size 3.7MB MOD Info For Android Category Tools Update September 01, 2021 (11 months ago) MOD Info? adb install apk install apk with adb adb install apk on device adb install apk to device The application ADB install apk provides users with the ability to debug their Android devices by making use of the services are the application provides them with. When the person starts in an ADB client then the application first of all checks that whether or not there is an ADB server process already running in the user’s android system. If there is no previous ADB server present in the application then the app starts the ADB server in the user’s device and binds it to the local TCP port 5037 and then look out for the commands that are sent from other ADB client. The user of ADB install apk will not have to worry as all of the ADB clients make use of the 5037 to communicate with the main ADB server. After all of this the server then establishes a connection from all of the running devices and locate the emulators by scanning the food that are normally in odd numbers ranging from 5555 to 5585. This range is used by the first 16 emulators. Upon finding a connection that is correctly placed the user will get to have the android debugging ability. The user will be able to make use of the debugging commands and then have it on their devices. The users of ADB install apk can also make use of a USB for the debugging process but they would have to enable the permission by going into the settings and the developer’s option. ADB install apk application also requires a user to grant some permissions to it so that it can work optimally and provide all of its services to which users. Android Debug Bridge ADB install apk application provides users with the ability to debug their android by making use of the android debug Bridge command line tool. This android debug Bridge command facilitates the users in making different changes to the device and carrying out the actions they want to. Install different applications the user of this application will be able to install other types of applications as well as the debugging apps and also provides them to have access to the UNIX shell. UNIX shell the users can also make use of the UNIX shell that helps them in running a variety of commands on their Android device. This will help them in providing a command line user interface for their operating systems and the cell also acts as an interactive command language as well as a scripted language that helps in in controlling the execution of the different commands on their android device. Client server program the ADB install apk application provides users with the ability to make use of the client server program that includes three different components which are a client, an adbd and a server. Intuitive user interface the application has a very intuitive and friendly user interface and user of this application can easily navigate to application without requiring any kind of tutorial or user guide for that purpose. Free of cost all of the services provided by the application ADB install apk are free of cost and the user will not have to put a strain on their wallet in order to make with of this amazing applications services. No need to Root your device this application helps the user in making use of all 5he services of the app without rooting their Android device. No interruption the application allows users to easily go through the applications without any interruption to the system working. ADB debugging by using USB the ADB install apk application also allows users to make use of the ADB service by making use of the USB debugging option. User will be able to make use of this option after enabling the USB debugging option in the developer options in the system settings. Multiple languages Support the application ADB install apk provides users with the ability to make use of its services in any of the languages the users Desire. The language options include Portuguese, English, Spanish, French, German, Japanese, Russian, Italian, Arabic, finish, Greek, Hindi, Korean, Turkish, Indonesian, Romania, Bulgarian, Thai, Slovak, Ukrainian, Amharic, Zulu, Armenian and many more. Since the application consists of this huge Number of languages so anyone from the whole entire wide world can easily make use of IT services without any difficulty. Safe and confidential application make sure that all of the information of its users is kept safe and confidential. The personal and private information of the users not shared over the internet and no third party can have access to it. Full time availability the application provides its services to its users 24/7 which means that the user can make use of the application services whenever they want and at wherever they are. No extensions required the application does not need any extensions to be installed to make use of all of its services. It is enough on its own. Conclusion The application ADB install apk provides users with a lot of different features in order for it to work properly. The user of this application can make use of the Adb method. The application ADB install apk provides all of its services for free which makes it even more desirable. Android Debug Bridge (adb) is a versatile command-line tool that lets you communicate with a device. The adb command facilitates a variety of device actions, such as installing and debugging apps, and it provides access to a Unix shell that you can use to run a variety of commands on a device. It is a client-server program that includes three components: A client , which sends commands. The client runs on your development machine. You can invoke a client from a command-line terminal by issuing an adb command. , which sends commands. The client runs on your development machine. You can invoke a client from a command-line terminal by issuing an adb command. A daemon (adbd) , which runs commands on a device. The daemon runs as a background process on each device. , which runs commands on a device. The daemon runs as a background process on each device. A server, which manages communication between the client and the daemon. The server runs as a background process on your development machine. adb is included in the Android SDK Platform-Tools package. You can download this package with the SDK Manager, which installs it at android_sdk /platform-tools/ . Or if you want the standalone Android SDK Platform-Tools package, you can download it here. For information on connecting a device for use over ADB, including how to use the Connection Assistant to troubleshoot common problems, see Run apps on a hardware device. How adb works When you start an adb client, the client first checks whether there is an adb server process already running. If there isn’t, it starts the server process. When the server starts, it binds to local TCP port 5037 and listens for commands sent from adb clients—all adb clients use port 5037 to communicate with the adb server. The server then sets up connections to all running devices. It locates emulators by scanning odd-numbered ports in the range 5555 to 5585, the range used by the first 16 emulators. Where the server finds an adb daemon (adbd), it sets up a connection to that port. Note that each emulator uses a pair of sequential ports — an even-numbered port for console connections and an odd-numbered port for adb connections. For example: Emulator 1, console: 5554 Emulator 1, adb: 5555 Emulator 2, console: 5556 Emulator 2, adb: 5557 and so on… As shown, the emulator connected to adb on port 5555 is the same as the emulator whose console listens on port 5554. Once the server has set up connections to all devices, you can use adb commands to access those devices. Because the server manages connections to devices and handles commands from multiple adb clients, you can control any device from any client (or from a script). Enable adb debugging on your device To use adb with a device connected over USB, you must enable USB debugging in the device system settings, under Developer options. To use adb with a device connected over Wi-Fi, see Connect to a device over Wi-Fi. On Android 4.2 and higher, the Developer options screen is hidden by default. To make it visible, go to Settings > About phone and tap Build number seven times. Return to the previous screen to find Developer options at the bottom. On some devices, the Developer options screen might be located or named differently. You can now connect your device with USB. You can verify that your device is connected by executing adb devices from the android_sdk /platform-tools/ directory. If connected, you’ll see the device name listed as a “device.” Note: When you connect a device running Android 4.2.2 or higher, the system shows a dialog asking whether to accept an RSA key that allows debugging through this computer. This security mechanism protects user devices because it ensures that USB debugging and other adb commands cannot be executed unless you’re able to unlock the device and acknowledge the dialog. For more information about connecting to a device over USB, read Run Apps on a Hardware Device. Connect to a device over Wi-Fi (Android 11+) Note: The instructions below do not apply to Wear devices running Android 11. See the guide to debugging a Wear OS app for more information. Android 11 and higher supports deploying and debugging your app wirelessly from your workstation using Android Debug Bridge (adb). For example, you can deploy your debuggable app to multiple remote devices without physically connecting your device via USB. This eliminates the need to deal with common USB connection issues, such as driver installation. Before you begin using wireless debugging, you must complete the following steps: Ensure that your workstation and device are connected to the same wireless network. Ensure that your device is running Android 11 or higher. For more informaton, see Check & update your Android version. Ensure that you have Android Studio Bumblebee. You can download it here. On your workstation, update to the latest version of the SDK Platform-Tools. To use wireless debugging, you must pair your device to your workstation using a QR Code or a pairing code. Your workstation and device must be connected to the same wireless network. To connect to your device, follow these steps: Enable developer options on your device: On your device, find the Build number option. You can find this in these locations for the following devices: Device Setting Google Pixel Settings > About phone > Build number Samsung Galaxy S8 and later Settings > About phone > Software information > Build number LG G6 and later Settings > About phone > Software info > Build number HTC U11 and later Settings > About > Software information > More > Build number or Settings > System > About phone > Software information > More > Build number OnePlus 5T and later Settings > About phone > Build number Tap the Build Number option seven times until you see the message You are now a developer! This enables developer options on your phone. Enable debugging over Wi-Fi on your device: On your device, find Developer options. You can find this option in these locations for the following devices: Device Setting Google Pixel, OnePlus 5T and later Settings > System > Developer options Samsung Galaxy S8 and later, LG G6 and later, HTC U11 and later Settings > Developer options In Developer options, scroll down to the Debugging section and turn on Wireless debugging. On the Allow wireless debugging on this network? popup, select Allow. Open Android Studio and select Pair Devices Using Wi-Fi from the run configurations dropdown menu. The Pair devices over Wi-Fi window pops up, as shown below. On your device, tap on Wireless debugging and pair your device: To pair your device with a QR code, select Pair device with QR code and scan the QR code obtained from the Pair devices over Wi-Fi popup above. To pair your device with a pairing code, select Pair device with pairing code from the Pair devices over Wi-Fi popup above. On your device, select Pair using pairing code and take note of the six digit pin code. Once your device appears on the Pair devices over Wi-Fi window, you can select Pair and enter the six digit pin code shown on your device. After you are paired, you can attempt to deploy your app to your device. To pair a different device or to forget this device on your workstation, navigate to Wireless debugging on your device, tap on your workstation name under Paired devices, and select Forget. If you want to quickly turn on and off wireless debugging, you can utilize the Quick settings developer tiles for Wireless debugging, found in Developer Options > Quick settings developer tiles. Alternatively, to connect to your device via command line without Android Studio, follow these steps: Enable developer options on your device, as described above. Enable Wireless debugging on your device, as described above. On your workstation, open a terminal window and navigate to android_sdk/platform-tools . Find your IP address, port number, and pairing code by selecting Pair device with pairing code. Take note of the IP address, port number, and pairing code displayed on the device. On your workstation’s terminal, run adb pair ipaddr:port . Use the IP address and port number from above. When prompted, enter the pairing code, as shown below. Resolve wireless connection issues If you are having issues connecting to your device wirelessly, you can try the following troubleshooting steps to resolve the issue. Check if your workstation and device meet the prerequisites To meet the prerequisites for wireless debugging, ensure that: Your workstation and device are connected to the same wireless network. Your device is running Android 11 or higher. For more information, see Check & update your Android version. You have Android Studio Bumblebee. You can download it here. You have the latest version of the SDK Platform Tools on your workstation. Check for other known issues The following is a list of current known issues with wireless debugging in Android Studio and how to resolve them. Wi-Fi is not connecting: Some Wi-Fi networks, such as corporate Wi-Fi networks, may block p2p connections and not allow you to connect over Wi-Fi.Try connecting with a cable or another Wi-Fi network. ADB over Wi-Fi sometimes turns off automatically: This can happen if the device either switches Wi-Fi networks or disconnects from the network. Connect to a device over Wi-Fi (Android 10 and lower) Note: The instructions below do not apply to Wear devices running Android 10 (or lower). See the guide to debugging a Wear OS app for more information. adb usually communicates with the device over USB, but you can also use adb over Wi-Fi. To connect a device running Android 10 or lower, there are some initial steps you must do over USB, as described below: Connect your Android device and adb host computer to a common Wi-Fi network accessible to both. Beware that not all access points are suitable; you might need to use an access point whose firewall is configured properly to support adb. If you are connecting to a Wear OS device, turn off Bluetooth on the phone that’s paired with the device. Connect the device to the host computer with a USB cable. Set the target device to listen for a TCP/IP connection on port 5555. adb tcpip 5555 Disconnect the USB cable from the target device. Find the IP address of the Android device. For example, on a Nexus device, you can find the IP address at Settings > About tablet (or About phone) > Status > IP address. Or, on a Wear OS device, you can find the IP address at Settings > Wi-Fi Settings > Advanced > IP address. Connect to the device by its IP address. adb connect device_ip_address :5555 Confirm that your host computer is connected to the target device: $ adb devices List of devices attached device_ip_address :5555 device You’re now good to go! If the adb connection is ever lost: Make sure that your host is still connected to the same Wi-Fi network your Android device is. Reconnect by executing the adb connect step again. Or if that doesn’t work, reset your adb host: adb kill-server Then start over from the beginning. Query for devices Before issuing adb commands, it is helpful to know what device instances are connected to the adb server. You can generate a list of attached devices using the devices command. adb devices -l In response, adb prints this status information for each device: Serial number: A string created by adb to uniquely identify the device by its port number. Here’s an example serial number: emulator-5554 State: The connection state of the device can be one of the following: offline : The device is not connected to adb or is not responding. device : The device is now connected to the adb server. Note that this state does not imply that the Android system is fully booted and operational because the device connects to adb while the system is still booting. However, after boot-up, this is the normal operational state of an device. no device : There is no device connected. Description: If you include the -l option, the devices command tells you what the device is. This information is helpful when you have multiple devices connected so that you can tell them apart. The following example shows the devices command and its output. There are three devices running. The first two lines in the list are emulators, and the third line is a hardware device that is attached to the computer. $ adb devices List of devices attached emulator-5556 device product:sdk_google_phone_x86_64 model:Android_SDK_built_for_x86_64 device:generic_x86_64 emulator-5554 device product:sdk_google_phone_x86 model:Android_SDK_built_for_x86 device:generic_x86 0a388e93 device usb:1-1 product:razor model:Nexus_7 device:flo Emulator not listed The adb devices command has a corner-case command sequence that causes running emulator(s) to not show up in the adb devices output even though the emulator(s) are visible on your desktop. This happens when all of the following conditions are true: The adb server is not running, and You use the emulator command with the -port or -ports option with an odd-numbered port value between 5554 and 5584, and The odd-numbered port you chose is not busy so the port connection can be made at the specified port number, or if it is busy, the emulator switches to another port that meets the requirements in 2, and You start the adb server after you start the emulator. One way to avoid this situation is to let the emulator choose its own ports, and don’t run more than 16 emulators at once. Another way is to always start the adb server before you use the emulator command, as explained in the following examples. Example 1: In the following command sequence, the adb devices command starts the adb server, but the list of devices does not appear. Stop the adb server and enter the following commands in the order shown. For the avd name, provide a valid avd name from your system. To get a list of avd names, type emulator -list-avds . The emulator command is in the android_sdk /tools directory. $ adb kill-server $ emulator -avd Nexus_6_API_25 -port 5555 $ adb devices List of devices attached * daemon not running. starting it now on port 5037 * * daemon started successfully * Example 2: In the following command sequence, adb devices displays the list of devices because the adb server was started first. To see the emulator in the adb devices output, stop the adb server, and then start it again after using the emulator command and before using the adb devices command, as follows: $ adb kill-server $ emulator -avd Nexus_6_API_25 -port 5557 $ adb start-server $ adb devices List of devices attached emulator-5557 device For more information about emulator command-line options, see Using Command Line Parameters. Send commands to a specific device If multiple devices are running, you must specify the target device when you issue the adb command. To specify the target, use the devices command to get the serial number of the target. Once you have the serial number, use the -s option with the adb commands to specify the serial number. If you’re going to issue a lot of adb commands, you can set the $ANDROID_SERIAL environment variable to contain the serial number instead. If you use both -s and $ANDROID_SERIAL , -s overrides $ANDROID_SERIAL . In the following example, the list of attached devices is obtained, and then the serial number of one of the devices is used to install the helloWorld.apk on that device. $ adb devices List of devices attached emulator-5554 device emulator-5555 device $ adb -s emulator-5555 install helloWorld.apk Note: If you issue a command without specifying a target device when multiple devices are available, adb generates an error. If you have multiple devices available, but only one is an emulator, use the -e option to send commands to the emulator. Likewise, if there are multiple devices but only one hardware device attached, use the -d option to send commands to the hardware device. Install an app You can use adb to install an APK on an emulator or connected device with the install command: adb install path_to_apk You must use the -t option with the install command when you install a test APK. For more information, see -t . For more information about how to create an APK file that you can install on an emulator/device instance, see Build and Run Your App. Note that, if you are using Android Studio, you do not need to use adb directly to install your app on the emulator/device. Instead, Android Studio handles the packaging and installation of the app for you. Set up port forwarding You can use the forward command to set up arbitrary port forwarding, which forwards requests on a specific host port to a different port on a device. The following example sets up forwarding of host port 6100 to device port 7100: adb forward tcp:6100 tcp:7100 The following example sets up forwarding of host port 6100 to local:logd: adb forward tcp:6100 local:logd Copy files to/from a device Use the pull and push commands to copy files to and from an device. Unlike the install command, which only copies an APK file to a specific location, the pull and push commands let you copy arbitrary directories and files to any location in a device. To copy a file or directory and its sub-directories from the device, do the following: adb pull remote local To copy a file or directory and its sub-directories to the device, do the following: adb push local remote Replace local and remote with the paths to the target files/directory on your development machine (local) and on the device (remote). For example: adb push foo.txt /sdcard/foo.txt Stop the adb server In some cases, you might need to terminate the adb server process and then restart it to resolve the problem (e.g., if adb does not respond to a command). To stop the adb server, use the adb kill-server command. You can then restart the server by issuing any other adb command. Issuing adb commands You can issue adb commands from a command line on your development machine or from a script. The usage is: adb [-d | -e | -s serial_number ] command If there’s only one emulator running or only one device connected, the adb command is sent to that device by default. If multiple emulators are running and/or multiple devices are attached, you need to use the -d , -e , or -s option to specify the target device to which the command should be directed. You can see a detailed list of all supported adb commands using the following command: adb –help Issue shell commands You can use the shell command to issue device commands through adb, or to start an interactive shell. To issue a single command use the shell command like this: adb [-d |-e | -s serial_number ] shell shell_command To start an interactive shell on a device use the shell command like this: adb [-d | -e | -s serial_number ] shell To exit an interactive shell, press Control + D or type exit . Note: With Android Platform-Tools 23 and higher, adb handles arguments the same way that the ssh(1) command does. This change has fixed a lot of problems with command injection and makes it possible to now safely execute commands that contain shell metacharacters, such as adb install Let\’sGo.apk . But, this change means that the interpretation of any command that contains shell metacharacters has also changed. For example, the adb shell setprop foo ‘a b’ command is now an error because the single quotes ( ‘ ) are swallowed by the local shell, and the device sees adb shell setprop foo a b . To make the command work, quote twice, once for the local shell and once for the remote shell, the same as you do with ssh(1) . For example, adb shell setprop foo “‘a b'” . Android provides most of the usual Unix command-line tools. For a list of available tools, use the following command: adb shell ls /system/bin Help is available for most of the commands via the –help argument. Many of the shell commands are provided by toybox. General help applicable to all toybox commands is available via toybox –help . See also Logcat Command-Line Tool which is useful for monitoring the system log. Call activity manager ( am ) Within an adb shell, you can issue commands with the activity manager ( am ) tool to perform various system actions, such as start an activity, force-stop a process, broadcast an intent, modify the device screen properties, and more. While in a shell, the syntax is: am command You can also issue an activity manager command directly from adb without entering a remote shell. For example: adb shell am start -a android.intent.action.VIEW Table 2. Available activity manager commands Command Description start [ options ] intent Start an Activity specified by intent . See the Specification for intent arguments. Options are: -D : Enable debugging. : Enable debugging. -W : Wait for launch to complete. : Wait for launch to complete. –start-profiler file : Start profiler and send results to file . : Start profiler and send results to . -P file : Like –start-profiler , but profiling stops when the app goes idle. : Like , but profiling stops when the app goes idle. -R count : Repeat the activity launch count times. Prior to each repeat, the top activity will be finished. : Repeat the activity launch times. Prior to each repeat, the top activity will be finished. -S : Force stop the target app before starting the activity. : Force stop the target app before starting the activity. –opengl-trace : Enable tracing of OpenGL functions. : Enable tracing of OpenGL functions. –user user_id | current : Specify which user to run as; if not specified, then run as the current user. startservice [ options ] intent Start the Service specified by intent . See the Specification for intent arguments. Options are: –user user_id | current : Specify which user to run as; if not specified, then run as the current user. force-stop package Force stop everything associated with package (the app’s package name). kill [ options ] package Kill all processes associated with package (the app’s package name). This command kills only processes that are safe to kill and that will not impact the user experience. Options are: –user user_id | all | current : Specify user whose processes to kill; all users if not specified. kill-all Kill all background processes. broadcast [ options ] intent Issue a broadcast intent. See the Specification for intent arguments. Options are: [–user user_id | all | current] : Specify which user to send to; if not specified then send to all users. instrument [ options ] component Start monitoring with an Instrumentation instance. Typically the target component is the form test_package / runner_class . Options are: -r : Print raw results (otherwise decode report_key_streamresult ). Use with [-e perf true] to generate raw output for performance measurements. : Print raw results (otherwise decode ). Use with to generate raw output for performance measurements. -e name value : Set argument name to value . For test runners a common form is -e testrunner_flag value [, value …] . : Set argument to . For test runners a common form is . -p file : Write profiling data to file . : Write profiling data to . -w : Wait for instrumentation to finish before returning. Required for test runners. : Wait for instrumentation to finish before returning. Required for test runners. –no-window-animation : Turn off window animations while running. : Turn off window animations while running. –user user_id | current : Specify which user instrumentation runs in; current user if not specified. profile start process file Start profiler on process , write results to file . profile stop process Stop profiler on process . dumpheap [ options ] process file Dump the heap of process , write to file . Options are: –user [ user_id | current] : When supplying a process name, specify user of process to dump; uses current user if not specified. : When supplying a process name, specify user of process to dump; uses current user if not specified. -n : Dump native heap instead of managed heap. set-debug-app [ options ] package Set app package to debug. Options are: -w : Wait for debugger when app starts. : Wait for debugger when app starts. –persistent : Retain this value. clear-debug-app Clear the package previous set for debugging with set-debug-app . monitor [ options ] Start monitoring for crashes or ANRs. Options are: –gdb : Start gdbserv on the given port at crash/ANR. screen-compat {on | off} package Control screen compatibility mode of package . display-size [reset | width x height ] Override device display size. This command is helpful for testing your app across different screen sizes by mimicking a small screen resolution using a device with a large screen, and vice versa. Example: am display-size 1280×800 display-density dpi Override device display density. This command is helpful for testing your app across different screen densities on high-density screen environment using a low density screen, and vice versa. Example: am display-density 480 to-uri intent Print the given intent specification as a URI. See the Specification for intent arguments. to-intent-uri intent Print the given intent specification as an intent: URI. See the Specification for intent arguments. Specification for intent arguments For activity manager commands that take an intent argument, you can specify the intent with the following options: Show all -a action Specify the intent action, such as android.intent.action.VIEW . You can declare this only once. -d data_uri Specify the intent data URI, such as content://contacts/people/1 . You can declare this only once. -t mime_type Specify the intent MIME type, such as image/png . You can declare this only once. -c category Specify an intent category, such as android.intent.category.APP_CONTACTS . -n component Specify the component name with package name prefix to create an explicit intent, such as com.example.app/.ExampleActivity . -f flags Add flags to the intent, as supported by setFlags() . –esn extra_key Add a null extra. This option is not supported for URI intents. -e | –es extra_key extra_string_value Add string data as a key-value pair. –ez extra_key extra_boolean_value Add boolean data as a key-value pair. –ei extra_key extra_int_value Add integer data as a key-value pair. –el extra_key extra_long_value Add long data as a key-value pair. –ef extra_key extra_float_value Add float data as a key-value pair. –eu extra_key extra_uri_value Add URI data as a key-value pair. –ecn extra_key extra_component_name_value Add a component name, which is converted and passed as a ComponentName object. –eia extra_key extra_int_value [, extra_int_value …] Add an array of integers. –ela extra_key extra_long_value [, extra_long_value …] Add an array of longs. –efa extra_key extra_float_value [, extra_float_value …] Add an array of floats. –grant-read-uri-permission Include the flag FLAG_GRANT_READ_URI_PERMISSION . –grant-write-uri-permission Include the flag FLAG_GRANT_WRITE_URI_PERMISSION . –debug-log-resolution Include the flag FLAG_DEBUG_LOG_RESOLUTION . –exclude-stopped-packages Include the flag FLAG_EXCLUDE_STOPPED_PACKAGES . –include-stopped-packages Include the flag FLAG_INCLUDE_STOPPED_PACKAGES . –activity-brought-to-front Include the flag FLAG_ACTIVITY_BROUGHT_TO_FRONT . –activity-clear-top Include the flag FLAG_ACTIVITY_CLEAR_TOP . –activity-clear-when-task-reset Include the flag FLAG_ACTIVITY_CLEAR_WHEN_TASK_RESET . –activity-exclude-from-recents Include the flag FLAG_ACTIVITY_EXCLUDE_FROM_RECENTS . –activity-launched-from-history Include the flag FLAG_ACTIVITY_LAUNCHED_FROM_HISTORY . –activity-multiple-task Include the flag FLAG_ACTIVITY_MULTIPLE_TASK . –activity-no-animation Include the flag FLAG_ACTIVITY_NO_ANIMATION . –activity-no-history Include the flag FLAG_ACTIVITY_NO_HISTORY . –activity-no-user-action Include the flag FLAG_ACTIVITY_NO_USER_ACTION . –activity-previous-is-top Include the flag FLAG_ACTIVITY_PREVIOUS_IS_TOP . –activity-reorder-to-front Include the flag FLAG_ACTIVITY_REORDER_TO_FRONT . –activity-reset-task-if-needed Include the flag FLAG_ACTIVITY_RESET_TASK_IF_NEEDED . –activity-single-top Include the flag FLAG_ACTIVITY_SINGLE_TOP . –activity-clear-task Include the flag FLAG_ACTIVITY_CLEAR_TASK . –activity-task-on-home Include the flag FLAG_ACTIVITY_TASK_ON_HOME . –receiver-registered-only Include the flag FLAG_RECEIVER_REGISTERED_ONLY . –receiver-replace-pending Include the flag FLAG_RECEIVER_REPLACE_PENDING . –selector Requires the use of -d and -t options to set the intent data and type. URI component package You can directly specify a URI, package name, and component name when not qualified by one of the above options. When an argument is unqualified, the tool assumes the argument is a URI if it contains a “:” (colon); it assumes the argument is a component name if it contains a “/” (forward-slash); otherwise it assumes the argument is a package name. Call package manager ( pm ) Within an adb shell, you can issue commands with the package manager ( pm ) tool to perform actions and queries on app packages installed on the device. While in a shell, the syntax is: pm command You can also issue a package manager command directly from adb without entering a remote shell. For example: adb shell pm uninstall com.example.MyApp Table 3. Available package manager commands. Command Description list packages [ options ] filter Prints all packages, optionally only those whose package name contains the text in filter . Options: -f : See their associated file. : See their associated file. -d : Filter to only show disabled packages. : Filter to only show disabled packages. -e : Filter to only show enabled packages. : Filter to only show enabled packages. -s : Filter to only show system packages. : Filter to only show system packages. -3 : Filter to only show third party packages. : Filter to only show third party packages. -i : See the installer for the packages. : See the installer for the packages. -u : Also include uninstalled packages. : Also include uninstalled packages. –user user_id : The user space to query. list permission-groups Prints all known permission groups. list permissions [ options ] group Prints all known permissions, optionally only those in group . Options: -g : Organize by group. : Organize by group. -f : Print all information. : Print all information. -s : Short summary. : Short summary. -d : Only list dangerous permissions. : Only list dangerous permissions. -u : List only the permissions users will see. list instrumentation [ options ] List all test packages. Options: -f : List the APK file for the test package. : List the APK file for the test package. target_package : List test packages for only this app. list features Prints all features of the system. list libraries Prints all the libraries supported by the current device. list users Prints all users on the system. path package Print the path to the APK of the given package . install [ options ] path Installs a package (specified by path ) to the system. Options: -r : Reinstall an existing app, keeping its data. : Reinstall an existing app, keeping its data. -t : Allow test APKs to be installed. Gradle generates a test APK when you have only run or debugged your app or have used the Android Studio Build > Build APK command. If the APK is built using a developer preview SDK (if the targetSdkVersion is a letter instead of a number), you must include the -t option with the install command if you are installing a test APK. : Allow test APKs to be installed. Gradle generates a test APK when you have only run or debugged your app or have used the Android Studio command. If the APK is built using a developer preview SDK (if the is a letter instead of a number), you must include the option with the command if you are installing a test APK. -i installer_package_name : Specify the installer package name. : Specify the installer package name. –install-location location : Sets the install location using one of the following values: 0 : Use the default install location 1 : Install on internal device storage 2 : Install on external media : Sets the install location using one of the following values: -f : Install package on the internal system memory. : Install package on the internal system memory. -d : Allow version code downgrade. : Allow version code downgrade. -g : Grant all permissions listed in the app manifest. : Grant all permissions listed in the app manifest. –fastdeploy : Quickly update an installed package by only updating the parts of the APK that changed. : Quickly update an installed package by only updating the parts of the APK that changed. –incremental : Installs enough of the APK to launch the app while streaming the remaining data in the background. To use this feature, you must sign the APK, create an APK Signature Scheme v4 file, and place this file in the same directory as the APK. This feature is only supported on certain devices. This option forces adb to use the feature or fail if it is not supported (with verbose information on why it failed). Append the –wait option to wait until the APK is fully installed before granting access to the APK. –no-incremental prevents adb from using this feature. uninstall [ options ] package Removes a package from the system. Options: -k : Keep the data and cache directories around after package removal. clear package Deletes all data associated with a package. enable package_or_component Enable the given package or component (written as “package/class”). disable package_or_component Disable the given package or component (written as “package/class”). disable-user [ options ] package_or_component Options: –user user_id : The user to disable. grant package_name permission Grant a permission to an app. On devices running Android 6.0 (API level 23) and higher, the permission can be any permission declared in the app manifest. On devices running Android 5.1 (API level 22) and lower, must be an optional permission defined by the app. revoke package_name permission Revoke a permission from an app. On devices running Android 6.0 (API level 23) and higher, the permission can be any permission declared in the app manifest. On devices running Android 5.1 (API level 22) and lower, must be an optional permission defined by the app. set-install-location location Changes the default install location. Location values: 0 : Auto: Let system decide the best location. : Auto: Let system decide the best location. 1 : Internal: install on internal device storage. : Internal: install on internal device storage. 2 : External: on external media. Note: This is only intended for debugging; using this can cause apps to break and other undesireable behavior. get-install-location Returns the current install location. Return values: 0 [auto] : Lets system decide the best location : Lets system decide the best location 1 [internal] : Installs on internal device storage : Installs on internal device storage 2 [external] : Installs on external media set-permission-enforced permission [true | false] Specifies whether the given permission should be enforced. trim-caches desired_free_space Trim cache files to reach the given free space. create-user user_name Create a new user with the given user_name , printing the new user identifier of the user. remove-user user_id Remove the user with the given user_id , deleting all data associated with that user get-max-users Prints the maximum number of users supported by the device. Call device policy manager ( dpm ) To help you develop and test your device management (or other enterprise) apps, you can issue commands to the device policy manager ( dpm ) tool. Use the tool to control the active admin app or change a policy’s status data on the device. While in a shell, the syntax is: dpm command You can also issue a device policy manager command directly from adb without entering a remote shell: adb shell dpm command Table 4. Available device policy manager commands Command Description set-active-admin [ options ] component Sets component as active admin. Options are: –user user_id : Specify the target user. You can also pass –user current to select the current user. set-profile-owner [ options ] component Sets component as active admin and its package as profile owner for an existing user. Options are: –user user_id : Specify the target user. You can also pass –user current to select the current user. : Specify the target user. You can also pass to select the current user. –name name : Specify the human-readable organization name. set-device-owner [ options ] component Sets component as active admin and its package as device owner. Options are: –user user_id : Specify the target user. You can also pass –user current to select the current user. : Specify the target user. You can also pass to select the current user. –name name : Specify the human-readable organization name. remove-active-admin [ options ] component Disables an active admin. The app must declare android:testOnly in the manifest. This command also removes device and profile owners. Options are: –user user_id : Specify the target user. You can also pass –user current to select the current user. clear-freeze-period-record Clears the device’s record of previously-set freeze periods for system OTA updates. This is useful to avoid the device’s scheduling restrictions when developing apps that manage freeze-periods. See Manage system updates. Supported on devices running Android 9.0 (API level 28) and higher. force-network-logs Forces the system to make any existing network logs ready for retrieval by a DPC. If there are connection or DNS logs available, the DPC receives the onNetworkLogsAvailable() callback. See Network activity logging. This command is rate-limited. Supported on devices running Android 9.0 (API level 28) and higher. force-security-logs Forces the system to make any existing security logs available to the DPC. If there are logs available, the DPC receives the onSecurityLogsAvailable() callback. See Log enterprise device activity. This command is rate-limited. Supported on devices running Android 9.0 (API level 28) and higher. Take a screenshot The screencap command is a shell utility for taking a screenshot of a device display. While in a shell, the syntax is: screencap filename To use the screencap from the command line, type the following: adb shell screencap /sdcard/screen.png Here’s an example screenshot session, using the adb shell to capture the screenshot and the pull command to download the file from the device: $ adb shell shell@ $ screencap /sdcard/screen.png shell@ $ exit $ adb pull /sdcard/screen.png Record a video The screenrecord command is a shell utility for recording the display of devices running Android 4.4 (API level 19) and higher. The utility records screen activity to an MPEG-4 file. You can use this file to create promotional or training videos or for debugging and testing. In a shell, use the following syntax: screenrecord [ options ] filename To use screenrecord from the command line, type the following: adb shell screenrecord /sdcard/demo.mp4 Stop the screen recording by pressing Control + C (Command + C on Mac); otherwise, the recording stops automatically at three minutes or the time limit set by –time-limit . To begin recording your device screen, run the screenrecord command to record the video. Then, run the pull command to download the video from the device to the host computer. Here’s an example recording session: $ adb shell shell@ $ screenrecord –verbose /sdcard/demo.mp4 (press Control + C to stop) shell@ $ exit $ adb pull /sdcard/demo.mp4 The screenrecord utility can record at any supported resolution and bit rate you request, while retaining the aspect ratio of the device display. The utility records at the native display resolution and orientation by default, with a maximum length of three minutes. Limitations of the screenrecord utility: Audio is not recorded with the video file. Video recording is not available for devices running Wear OS. Some devices might not be able to record at their native display resolution. If you encounter problems with screen recording, try using a lower screen resolution. Rotation of the screen during recording is not supported. If the screen does rotate during recording, some of the screen is cut off in the recording. Table 5. screenrecord options Options Description –help Displays command syntax and options –size width x height Sets the video size: 1280×720 . The default value is the device’s native display resolution (if supported), 1280×720 if not. For best results, use a size supported by your device’s Advanced Video Coding (AVC) encoder. –bit-rate rate Sets the video bit rate for the video, in megabits per second. The default value is 4Mbps. You can increase the bit rate to improve video quality, but doing so results in larger movie files. The following example sets the recording bit rate to 6Mbps: screenrecord –bit-rate 6000000 /sdcard/demo.mp4 –time-limit time Sets the maximum recording time, in seconds. The default and maximum value is 180 (3 minutes). –rotate Rotates the output 90 degrees. This feature is experimental. –verbose Displays log information on the command-line screen. If you do not set this option, the utility does not display any information while running. Read ART profiles for apps Starting in Android 7.0 (API level 24) the Android Runtime (ART) collects execution profiles for installed apps, which are used to optimize app performance. You might want to examine the collected profiles to understand which methods are determined to be frequently executed and which classes are used during app startup. To produce a text form of the profile information, use the command: adb shell cmd package dump-profiles package To retrieve the file produced, use: adb pull /data/misc/profman/ package .txt Reset test devices If you test your app across multiple test devices, it may be useful to reset your device between tests, for example, to remove user data and reset the test environment. You can perform a factory reset of a test device running Android 10 (API level 29) or higher using the testharness adb shell command, as shown below. adb shell cmd testharness enable When restoring the device using testharness , the device automatically backs up the RSA key that allows debugging through the current workstation in a persistent location. That is, after the device is reset, the workstation can continue to debug and issue adb commands to the device without manually registering a new key. Additionally, to help make it easier and more secure to keep testing your app, using the testharness to restore a device also changes the following device settings: The device sets up certain system settings so that initial device setup wizards do not appear. That is, the device enters a state from which you can quickly install, debug, and test your app. Settings: Disables lock screen Disables emergency alerts Disables auto-sync for accounts Disables automatic system updates Other: Disables preinstalled security apps If you app needs to detect and adapt to the default settings of the testharness command, you can use the ActivityManager.isRunningInUserTestHarness() . sqlite sqlite3 starts the sqlite command-line program for examining sqlite databases. It includes commands such as .dump to print the contents of a table, and .schema to print the SQL CREATE statement for an existing table. You can also execute SQLite commands from the command line, as shown below. $ adb -s emulator-5554 shell $ sqlite3 /data/data/com.example.app/databases/rssitems.db SQLite version 3.3.12 Enter “.help” for instructions For more information, see the sqlite3 command line documentation. Whenever you consider installing an app on your Android smartphone, what is actually the first thing that comes to your mind? Google Play Store, right? Downloading and also installing an app from the Play Store is actually the simplest and easiest method to do that. However, it most certainly isn’t the only method as well. Well, for starters, you always have the option in order to install apps from their APK files. These files are just like setup files for software that can be downloaded via a web browser like chrome and then installed as and whenever required. The only requirement is that you turn on the Unknown Sources permission for your browser. In this article, we are going to talk about How to Install APK Using ADB Commands. Let’s begin! Now, the described method needs you to have direct access to your device. However, consider a situation where accidentally some system file damages. This actually causes your UI to crash and leaving you along with no way to access your phone. The only way in order to resolve the issue is to install a third-party UI app so that the device starts working again. This is actually where ADB comes in. It permits you to control your device via a computer. It is the only way in which you guys can install apps on your device in a situation like this. Well, this is just one of many scenarios where ADB could actually be a lifesaver. Hence, it would only do you good if you knew more about ADB and learned how you can use it and that’s exactly what we are going to do. We are now going to discuss what is ADB and how it works. We will also take you through the numerous steps involved in the process of setting up and then using ADB in order to install apps on your device. How to Install APK Using ADB Commands What is ADB? ADB basically stands for Android Debug Bridge. It is a command-line tool that is actually part of the Android SDK (Software Development Kit). It permits you to control your Android smartphone using a PC provide that your device is connect to the computer through a USB cable. You can also use it to install or uninstall apps, transfer files, get information about the network, or also a Wi-Fi connection. Check battery status, take screenshots or screen recording and so much more as well. It also has a set of codes that allow you to perform a lot of operations on your device. As a matter of fact, ADB is a really powerful tool that is capable of performing advanced operations that a good amount of practice and training to master as well. The more you explore the world of coding, the more useful ADB will it become for you as well. But, actually for the sake of keeping things simple, we are just going to cover some basics and mainly teach you how you guys can install an APK using ADB. How does it work? ADB uses USB debugging in order to take control of your device. When connected to a computer via a USB cable, the ADB client is able in order to detect the connected device. It also uses a command line or command prompt whenever the medium is in order to relay the commands and information between the computer and the Android device as well. There are special codes or commands which permit you to control the processes and operations on your Android device. What are the various Prerequisites for using ADB? Now, before you guys can install APK using ADB commands, you have to make sure the following pre-requisites are met. The first thing that you need is just to make sure that the device’s driver is install on your PC. Each and every Android smartphone comes along with its own device driver that automatically gets installed whenever you connect your phone to your PC. If your device does not have one then you have to download the driver separately. For Google devices such as Nexus, you can find just install Google USB Driver which is a part of SDK (we will discuss this later). Many other companies such as Samsung, HTC, Motorola, etc. give drivers on their respective sites. The next thing that you need is just to enable USB debugging on your Android smartphone. The option to do that you can find under Developer options. First, turn on the Developer Options from the Settings menu. After that, you have to enable USB debugging from the Developer options. Open Settings and then tap on the System option. Now, click on Developer options . from the Developer options. Scroll down and then under the Debugging section , you guys will find the setting for USB debugging . Simply toggle on the switch and now you are good to go. Last but not least, you have to download and install ADB on your computer. We will also discuss this in the next section and guide you through the whole installation process. How to Download and Install ADB on Windows? As mentioned earlier, ADB is also a part of the Android SDK and thus, you guys have to download the whole setup package for the tool kit. Tap on here to head to the downloads page for Android SDK platform tools. to head to the downloads page for Android SDK platform tools. Now, tap on the “Download SDK Platform-Tools for Windows” button. You can choose the other options as well relying upon the operating system that you are using. button. You can choose the other options as well relying upon the operating system that you are using. Agree to the Terms and Conditions and then tap on the Download button . . When the zip file is downloads then extract it at a location where you want to save the tool kit files. You guys will be able to see the ‘ADB’ present in the folder along with other tools. The installation process is now complete. We will now be moving to the next step that is actually using ADB to install APK on your device. How can you Use ADB to install APK on your device? Before you guys proceed to install APK using ADB commands, you have to make sure that ADB is set up properly and the device connected is being detected properly as well. In order to do this, just connect your Android device to the computer and then open the folder containing the SDK platform-tools as well. Now in this folder, you have to hold down Shift and then right-click. From the menu select the “Open Command window here” option. If the option in order to open the command window is really not available, then just click on the “Open PowerShell window here”. Then, in the Command Prompt window/PowerShell window type the following code: “ .\adb devices ” and click on Enter. ” and click on Enter. This will also show the name of your device in the command window. If it does not, then there is a problem along with the device’s driver. There is also a simple solution to this problem. Head to the search bar on your computer and open Device Manager. Your Android device will actually be listed there. Right-click on it and simply click on the update driver option. on it and simply click on the Next, just tap on the option to look for Drivers online. If there are any new drivers available then they will automatically get downloaded and installed on your PC as well. on your PC as well. Then, head back to the command prompt/PowerShell window and type the same command provided above, and click on Enter. You will now be able to see the name of the device displayed on the screen. This basically confirms that ADB has been successfully set up and your device is actually connected properly. You can now perform any operations on your phone via the ADB commands. These commands have to be entered in the Command Prompt or PowerShell window. In order to install an APK on your device through ADB, you need to have the APK file saved on your computer. Let us assume that we are installing the APK file for the VLC media player as well. Follow the steps given below to install the app on your device: The very first thing that you have to do is move the APK file to the folder containing the SDK platform tools. This will also make it easier as you would not have to type the whole path for the location of the APK file separately. Next, open the command prompt window or PowerShell window and also type in the following command: “ adb install ” where the app name is actually the name of the APK file. In our case, it will also be “VLC.apk” When the installation is complete, you guys will be able to see the message “Success” displayed on your screen. Hence, you have now successfully learned how you can install APK using ADB commands. But, as mentioned above ADB is a powerful tool and can be used to perform a lot of other operations. All that you have to know is the correct code and syntax and you will be able to do that much more. In the next section, we also have a little bonus for you. We will be listing down many selected important commands that you guys can try and have fun experimenting with. Other Important ADB Commands “ADB installs -r This command permits you to re-install or update an existing app. Take for example you already have an app installed on your device, however, you want to update the app via the latest APK file for the app. It is also useful whenever a system app is corrupt and you have to replace the corrupt app via its APK file. “ADB installs -s This command allows you in order to install an app on your SD card provided the app is actually compatible to be installed on the SD card. And also if your device permits apps to install on the SD card. “Also ADB uninstalls This command permits you to uninstall an app from your device. But, one thing that needs to keep in mind is that you have to type in the entire package name whenever uninstalling an app. Such as you have to write “com.Instagram.android” in order to uninstall Instagram from your device as well. “ADB logcat” – This command allows you in order to view the device’s log files. This command allows you in order to view the device’s log files. “ADB shell” – This command also allows you to open an interactive Linux command-line shell on your Android device as well. This command also allows you to open an interactive Linux command-line shell on your Android device as well. “Also, ADB push This command permits you in order to transfer some files on your computer to the SD card of your Android device. Here “ ” actually stands for the pathway of the file on your computer and “folder name” is actually the directory where the file will also get transferred on your Android device. “ADB pull /sdcard/ This command can also be considered to be the reverse of the push command. It permits you to transfer a file from your Android device to your PC. You have to type in the name of the file on your SD card in place of “ ”. Specify the location on your computer where you guys want to save the file in place of “file location path” as well. “adb reboot” – This command also permits you to restart your device. You can also chose to boot your device in bootloader via adding -bootloader after reboot. Some devices also permit you to directly boot into Recovery mode via typing “reboot recovery” rather than simply reboot. Conclusion Alright, That was all Folks! I hope you guys like this article and also find it helpful to you. Give us your feedback on it. Also if you guys have further queries and issues related to this article. Then let us know in the comments section below. We will get back to you shortly. Have a Great Day! Also See: How to Fix We couldn’t update the system reserved partition Besides sideloading APK on Android devices, you can also install APK using ADB commands. In this tutorial, we’ll see how we can sideload APK via ADB easily. Read on to learn more. Hello folks, how do you install an app on your Android-powered device? Most of my pals answered this question with the most common answers like installing from the Google Play Store app on their Android devices or installing apps by logging into their Play Store on the PC and installing Standalone apps from the SD card by enabling the Unknown Sources option in the device settings. Most of the Android users fall into one of these categories because that’s the simple way to install apps. But what if the UI of your device collapsed and you can’t access any apps on your device? When you’re playing with some random app, your device may sometime collapse due to that app interfering with your device UI. This most possible scenario is that the device’s launcher is hung and cannot be accessed. As you know without the launcher app, you cannot access anything on your device. Thus, if you need to install any third-party launcher app to get into your device, you have to download the launcher app APK on your PC. If the Google Play Services has collapsed (this usually happens when you try to mod your device), you cannot install the app from Play Store at all. In that case, the ADB comes to your rescue. ADB is the acronym for Android Device Bridge which acts a bridge between your PC and Android device. You can install apps through this ADB tool, but it is not limited to it, the scope of ADB tool is far higher and even if you know little about Android development you will understand its importance. But for the sake of the topic, we will show you how to install android apps from ADB. So let’s get on with the guide. Preparations Proper Device drivers installed on your PC for your device. Either setup ADB and Fastboot on your computer, or download the ADB and Fastboot SDK Platform-Tools . the . Enable USB Debugging on your device. If you don’t know how to do it, follow the instructions given here. Don’t Miss How to Find Your IP Address on Android Install APK Using ADB Commands Let’s make the ingredients ready, extract the ADB files to a folder on your PC and place the APK file you want to install (We are installing Whatsapp) You should have the similar files: Now open a command prompt in the ADB folder by holding the Shift key and Right Click in the empty space in the folder. Connect your device to the PC and type the following command to verify whether your device is detected by the PC. adb devices If detected you will see the output similar to below: If your device is not shown under the List of devices, check the device drivers on your PC and come back. Now type the following command to install the app from your PC: adb install That’s it, try this little trick on your device. Let us know the outcome in the comments section below. 다음은 Bing에서 adb apk installer 주제에 대한 검색 결과입니다. 필요한 경우 더 읽을 수 있습니다. 이 기사는 인터넷의 다양한 출처에서 편집되었습니다. 이 기사가 유용했기를 바랍니다. 이 기사가 유용하다고 생각되면 공유하십시오. 매우 감사합니다! How #to #force #install #any #apk #using #adb YouTube에서 adb apk installer 주제의 다른 동영상 보기 주제에 대한 기사를 시청해 주셔서 감사합니다 How to force install any apk using adb | adb apk installer, 이 기사가 유용하다고 생각되면 공유하십시오, 매우 감사합니다.Install APK via ADB Commands on Android Devices
주제와 관련된 이미지 adb apk installer
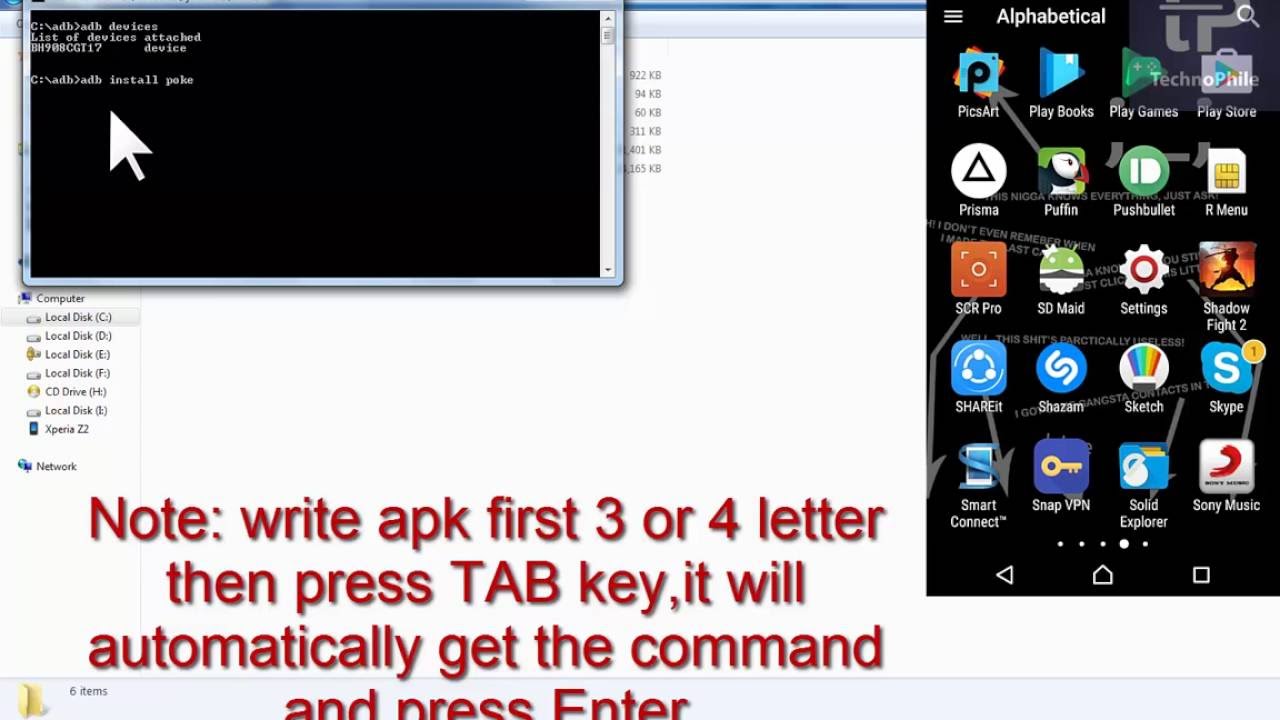
주제에 대한 기사 평가 adb apk installer
Install an apk file from command prompt?
How to Install APK Using ADB Commands
Cài đặt các ứng dụng Android APK -taimien
How to install ADB to install APK files
[TOOL][ADB][Windows]APK Installer For Multiple-User Android System [NO ROOT]
ADB Install Apk v1.6.0 Download For Android
Android Debug Bridge (adb)
How to Install APK Using ADB Commands
Install APK via ADB Commands on Android Devices
키워드에 대한 정보 adb apk installer
사람들이 주제에 대해 자주 검색하는 키워드 How to force install any apk using adb